Create a Mirror Effect in Photoshop – Example: London Operator | Photoshop Tutorial
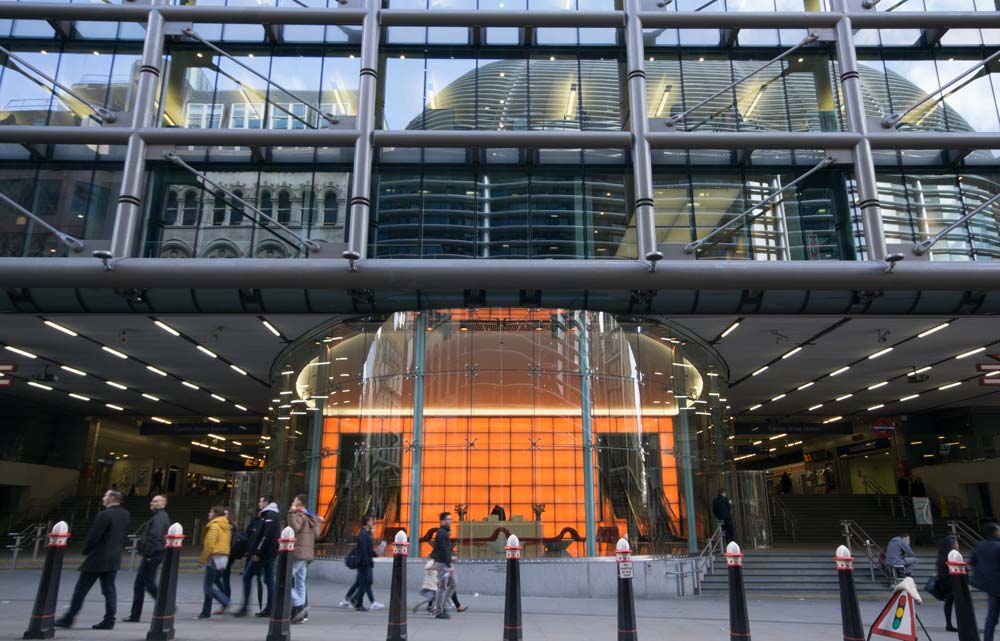
Welcome back! Today it is time for some black and white action. While spending some days in London, I aimlessly wandered around to see what the city has to offer, photography wise. And I was not disappointed! When I saw this railway station, I right away thought about an image that is mirrored, with the man in the glass cubicle being some sort of operator. I did not have much time to stop, which is why I literally walked out on the road with heavy traffic, stopped it for a second and took my image. The drivers seemed not to mind to wait for a moment, something I am very thankful for. We all know how mad drivers can get every now and again, hehe. So, let’s create a mirror effect in Photoshop.
Remember, if you like the video, make sure to subscribe for more weekly Photoshop and Photography action!
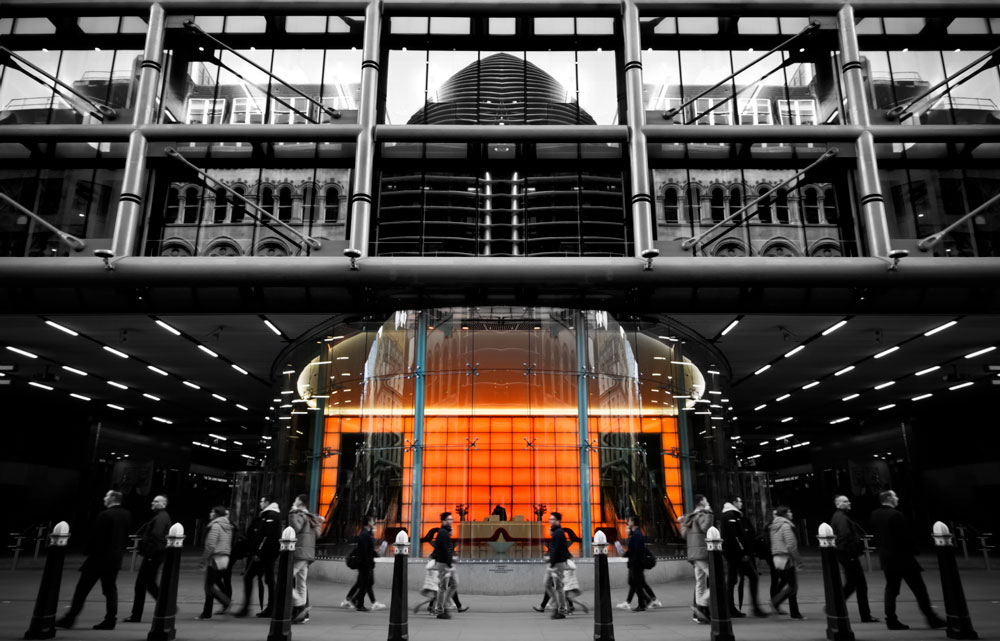
Here is the final image:
And here is the original image:
Part one – Mirror the Image in Photoshop (1:45 min)
Mirroring the image is the easy part, believe it or not. The only thing I had to do was to select my Marquee tool (M) and draw a selection around half the image. Once done, I hit CMD+J on the keyboard to duplicate the half onto a new layer.
After this, I hit CMD+T to get the transform tool and flipped the image horizontally. This was followed by moving the half to the right and making sure it fits nicely. If there are certain parts in the centre of the image that you do not want to mirror (such was my case), then you can just use a layer mask and a brush and remove the layer.
Part Two – Creating the Black and White Image (3:50 min)
There are several ways to create a black and white image in Photoshop – I did it this time using a simple black and white adjustment layer. You can always play with the sliders there if you feel like to adapt the BW intensity – but at some point, just take it, haha. To get the orange out of the center of the image, I used a white layer mask and a black brush to hide the BW layer from the center of the image.
Part Three – Cleaning the Image (7:00 min)
From this point, it really depends on how you like it when you create a mirror effect in Photoshop. I created a stamp visible (CMD/Ctrl + Alt + Shift + E) and hit CMD+T to drag the edges a little, making the image straight. Further, I added a slight vignette by creating another stamp visible (CMD/Ctrl + Alt + Shift + E) and selecting Filter-Camera Raw Filter. There, I went to the fx tab and created a soft vignette. If it is too strong, you can always reduce the opacity or use a layer mask to remove it from certain areas.
Remember, shortcuts make your life easier and can speed up your processing a lot! Here is what I used in this image and most of my landscape Photoshop tutorials:
B for the brush
X to change between background and foreground colors
V for the move tool
M for the marquee tool
Shift+M for the circular marquee tool
CMD+T for the transform tool
CMD+I to invert anything
CMD+J to duplicate a layer or a selection
CMD+Alt+Shift+N to get a new layer
CMD+Alt+Shift+E to get a stamp visible
On a Windows PC, just replace the CMD with Ctrl.
If you like my images, make sure to check out my portfolio!
Don’t forget to get out there and take some pictures yourself, maybe even create a mirror effect in Photoshop? – let me know if you have any awesome images from London! I am sure there are a thousand and one spots I have missed if course, and I wish I could see them all. Enjoy taking pictures peeps!