How to Create a Magical Scene in Photoshop – Example: The Dark Valley | Photoshop Tutorials
Welcome back to another one of my Photoshop tutorials! Today, it is time once more to create a little magic. The image I started out with wasn’t the best, but there was plenty of room to improve. If you have not used Photoshop much before, I suggest to read all about layer masks here, it will come in handy 🙂 Remember, if you like the video, make sure to subscribe for more weekly Photoshop and Photography action!
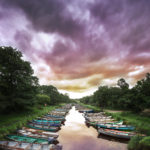
Here is the final image:

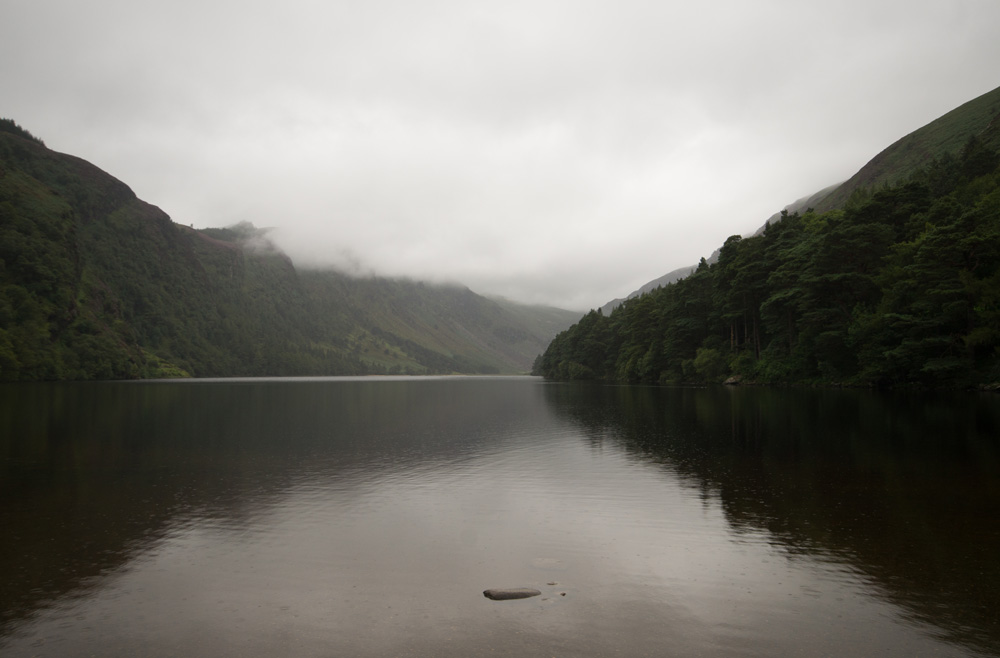
And here is the original:
Part One – Darken the Sky (1:20 min)
To darken the sky, we have to select it properly first. Because in this particular case, the whole thing was mainly white, I simply used the Magic Wand Tool and selected all the areas in the sky by holding Shift on the keyboard. Once this was done, I created a curve adjustment layer and darkened the hell out of the sky. Because we had done the selection before, the change only affects the sky.
Part Two – Add some Darkness to the Mountain Area (2:05 min)
With the above change, it looks super crap! The reason is that clear difference between the mountains and the sky. This can easily be fixed: I started by creating a new layer (CMD+Shift+Alt+N) and hit G for the Gradient Tool. With black to foreground selected, I dragged from top to bottom. This covered half the image, which is not exactly what was intended. So, remember the Curve adjustment we used earlier to darken the sky? I held Alt and dragged and dropped this old layer mask onto the new layer with the black. Photoshop asked if I want to replace the layer mask – sure, go ahead! Now, with the layer mask selected, I hit CMD+I to invert and it looked way better already. Using a white brush on the layer mask, I masked out some areas which were too dark.
Part Three – Create a Sun (4:50 min)
The sky was cool at this point, but a nice sun behind those clouds would have made all the difference. So, I hit CMD+Shift+Alt+E to create a so-called Stamp Visible. This will copy everything that is visible onto a new layer. With this new layer selected, I went to Filter-Render-Lighting Effects. There I selected a simple point light and placed it in the clouds. Awesome!
Part Four – Fix THE Issue (5:40)
When we darkened the sky and the mountain area, we created a thin white line between the two of them! That is not what we want, especially because we will add light rays later which would then illuminate this line. So, let’s remove it. To do so, I went back to the perfect selection of the sky we did initially, and with CMD pressed, I clicked on it. This made a nice selection of the sky. After hitting CMD+Shift+Alt+E again to create a stamp visible, I just hit CMD+J to place the sky onto a new layer. Hitting V on the keyboard to activate the Move Tool, I was then able to use the arrow keys to move the sky downwards juuuuuuuuuust a tiny bit. This reduced the white line perfectly, and some brush strokes with a black brush did the rest.
Part Five – Create Light Rays (7:30 min)
Here is one fun part! Creating light rays is easy and fast: First, create a new layer by hitting CMD+Shift+Alt+N. Then go into your Brush settings (on the upper right, check in the video if you cannot find it) and drag the sliders for scattering and spacing. Once this is done, hold Alt and select a colour which is close to the light source (not white, something close to white would be best haha). Then start to scatter some dots on the new layer. Once done, I went to Filter-Blur-Motion Blur, selected Zoom as the blur method and dragged the amount slider all the way to the right. After hitting Ok, the dots will be gone and there will be light rays instead. After this, I hit CMD+T to transform the rays. There are many ways to do so – I used CMD+drag and Alt+drag to shape the rays in the way I wanted it.
To make sure the light does not look fake, we have to reduce the strength of it in some places. Therefore, I hit the little Japanese flag symbol at the lower right to create a layer mask, after which I used a black Brush on that layer mask to reduce the visibility of the rays where they were too strong. Great!
Part Six – Mirror the Sky into the Water (7:00 min)
It is time to bring some of the detail we have in the sky into the water, especially with the new and improved light source, hehe. So, I hit M on the keyboard to get the Marquee tool and made a rectangular selection around the sky and the mountains. Then I hit CMD+Shift+Alt+E to create a Stamp Visible, followed by CMD+J to copy the selection onto a new layer. By hitting CMD+T (transform), I flipped the sky over and adjusted the visibility using a layer mask and a brush, just as before.
Part Eight – Reduce Colour Noise (16:50 min)
Remember when we used a curve adjustment to darken down the sky? We darkened it down a lot, and sometimes if you do this you will find strange colour patterns in the areas which were darkened down. In order to get rid of those, I created a Stamp visible (CMD+Shift+Alt+E) and changed its blending mode to Colour. Then I went to Blur-Gaussian Blur and selected an amount of around 150 px. I created a layer mask, inverted it (CMD+I), and used a White Brush to bring the “reduced colour” into the areas affected.
Part Nine – Add Clarity to the Image (20:00 min)
I saved the best for last (as usual in my Photoshop tutorials haha) – After creating a Stamp Visible (CMD+Shift+Alt+E), I went to Filter-Camera Raw Filter and brought the Clarity slider all the way to the right. Once back in the normal Photoshop window, I used a layer mask and a brush like before to remove the effect from where I didn’t like it. And that’s it! That is all there is to create a magical scene in Photoshop.
Remember, shortcuts make your life easier and can speed up your processing a lot! Here is what I used in this image:
CMD+Alt+Shift+E to create a stamp visible
B for the brush
X to change between background and foreground colours
CMD+Alt+Shift+N to create a new empty layer
CMD+I to invert anything
CMD+J to duplicate a layer or a selection
Shift+G for the paint bucket tool
G for the gradient tool
M for the Marquee tool
If you like my images, make sure to check out my portfolio!
Don’t forget to get out there and take some pictures yourself! I hope you enjoy my Photoshop tutorials, let me know what you create!