How to Post Process Landscape Images in Photoshop – Example: The Arches Entrance | Photoshop Tutorial
Welcome back! Today, I will take you with me to the entrance area of the Arches National Park in Utah. Why not going in? Well, there is no particular reason, but a great photography story. When my friends and I started the hike through the park, it was quite overcast – which is not a problem, I do like dramatic skies as you may know. But the more time we spent in the park, the more I thought about how great it would be to capture a stunning sunset across the mountains.
Being the last people that leave the park, I gave up hope as the weather just wasn’t in the place to give me the sunset I craved. However, the decent and the walk back to the entrance took long, and by the time we reached the exit, I had the pleasure of observing a truly unique play of colors in the sky. This is exactly what I will show you today, the colorful sunset of the Arches National Park. Doing so, you will learn how to post process landscape images in photoshop.
Remember, if you like the video, make sure to subscribe for more weekly Photoshop and Photography action!
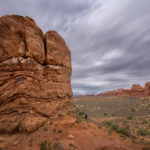
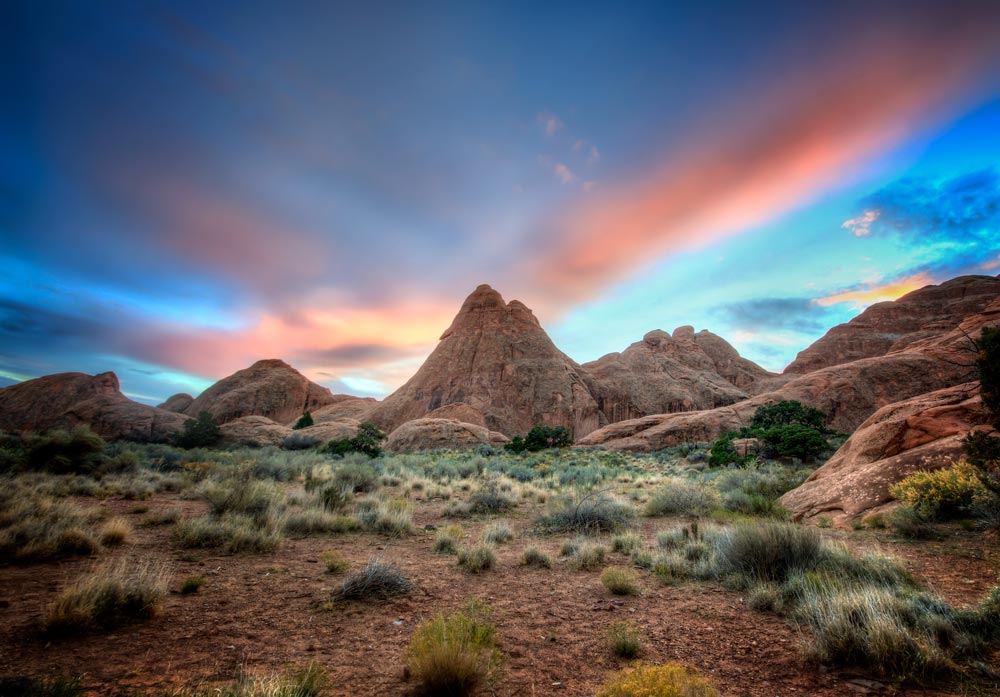
So, here is the final image:
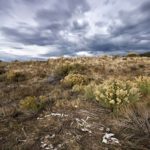
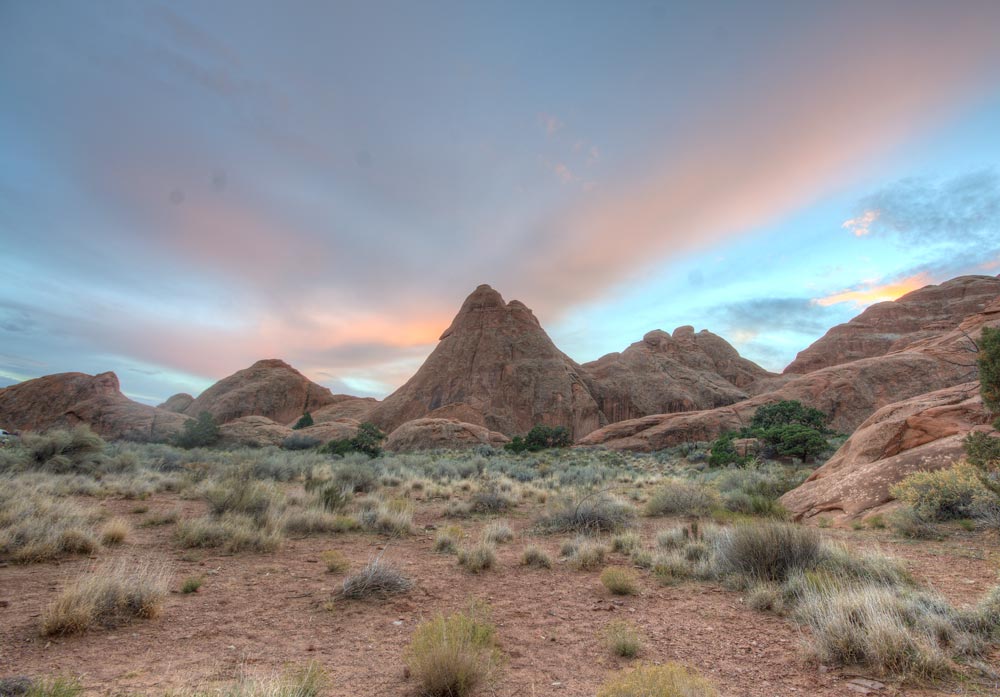
And here is the original:
Part One – Adding Contrast and Darken the Image in Photoshop (3:15 min)
Starting out, I had to add some more contrast to the image to get a better-defined foreground as well as a little nicer looking sky. For that, I started out using one of the Nik collection filters. If you have not downloaded the Nik collection yet, go ahead and go for it, it is free!
So, first I created a copy of my background layer by hitting CMD+J on the keyboard. Once done, I went to Filter-Nik Collection-Color Effex Pro-Tonal Contrast. There, I essentially just agreed with the standard settings and hit Ok. Now, the effect was then visible everywhere, which is not exactly what I need, I only wanted it for certain spots of the foreground as well as the sky. Therefore, I created a layer mask, inverted the layer mask, and used a white brush the bring the effect through where I felt like.
You have never used layer masks before? Have a look here to see how thy can be used. I use them every day and they are essential when learning how to post process landscape images in photoshop.
Now, the next step was to darken down the image. For this, I used a simple curve adjustment layer, in which I dragged the curve down. I then hit CMD+I to invert the layer mask and used a white brush to bring the darkness to the sky.
Part Two – Increase the Contrast in the Foreground and Remove Dust Spackles (8:30 min)
To add some more contrast to the foreground, I went ahead and created a stamp visible (CMD+Alt+Shift+E) which copies everything that is visible onto a new layer. I went then to Filter-Camera Raw Filter, where I used the clarity slider and dragged it to the right. After hitting Ok, I used a layer mask and a white brush to get the effect where I needed it.
To remove traces of dust from the lens or the sensor (I hope the lens), I created another stamp visible (CMD+Alt+Shift+E). I then selected the patch tool on the right, circled the patches, and dragged them slightly to another area that looked better. Done! This tool is truly amazing, try it out!
Part Three – Reduce Noice in Photoshop (13:00 min)
Removing noise in Photoshop can be very fast. There are several ways of doing it – my first try is usually the camera raw filter. So, after creating a stamp visible, I went to Filter-Camera Raw Filter-Detail and used the Noise reduction slider. This is something you will have to play around with, there are no general settings that will work for every image – but as you get a live preview, you can see right away what the changes you make will do. After I made the change, I used a layer mask to distribute the effect into the sky. Get used to noise, it is a common theme at night if you are a little in a rush – so learning how to deal with it is great when learning how to post process landscape images in photoshop.
Part Four – Create a Vignette in Photoshop (15:30 min)
Next, I wanted to darken down the edges of the image to place some more attention on the center. For this, I used a levels adjustment layer, where I played a little bit with the sliders. Once happy, I used a layer mask as described before. After doing this, I noticed there was a little too much brightness in the very foreground, so I also used a curve adjustment layer where I dragged the curve down.
Part Five – Remove Chromatic Aberrations in Photoshop (18:00 min)
Chromatic aberrations can be a nightmare – if you do not know how to remove them! Here is what you have to do:
– Create a stamp visible (CMD+Alt+Shift+E)
– Change the blending mode to Color
– Go to Filter-Blur-Gaussian Blur and select something between 3 and 10 px and hit Ok
– Create a layer mask, invert it (CMD+I) and use a white brush with around 60% opacity
– Go over the edges that have the aberrations
And that is all there is to it! Sometimes, this procedure has to be repeated, or the blur needs to be adjusted, but you get the idea. You can also see one of my older tutorials on the matter here, it is a great step when learning how to post process landscape images in photoshop.
Remember, shortcuts make your life easier and can speed up your processing a lot! Here is what I used in this image and most of my Photoshop tutorials:
CMD+Alt+Shift+E to create a stamp visible
B for the brush
X to change between background and foreground colors
CMD+I to invert anything
CMD+J to duplicate a layer or a selection
CMD+Alt+Shift+N to get a new layer
CMD+G to group things
On a Windows PC, just replace the CMD with Ctrl.
If you like my images, make sure to check out my portfolio!
Don’t forget to get out there and take some pictures yourself – time for some photography in Italy? Have you been to Venice yourself? Show me your images!! I hope you enjoy my Photoshop tutorials and this image in particular and I see you next time.