How to use Photoshop to Edit Night Images
Welcome back! Today it’s time for some night photography peeps! I don’t do it nearly as often as I should to be honest, but anyway, let’s do this. In this post and video, I will show you how to use photoshop to edit the below night image. If you like the video, make sure to subscribe for more weekly Photoshop and Photography action! Here is the
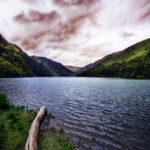
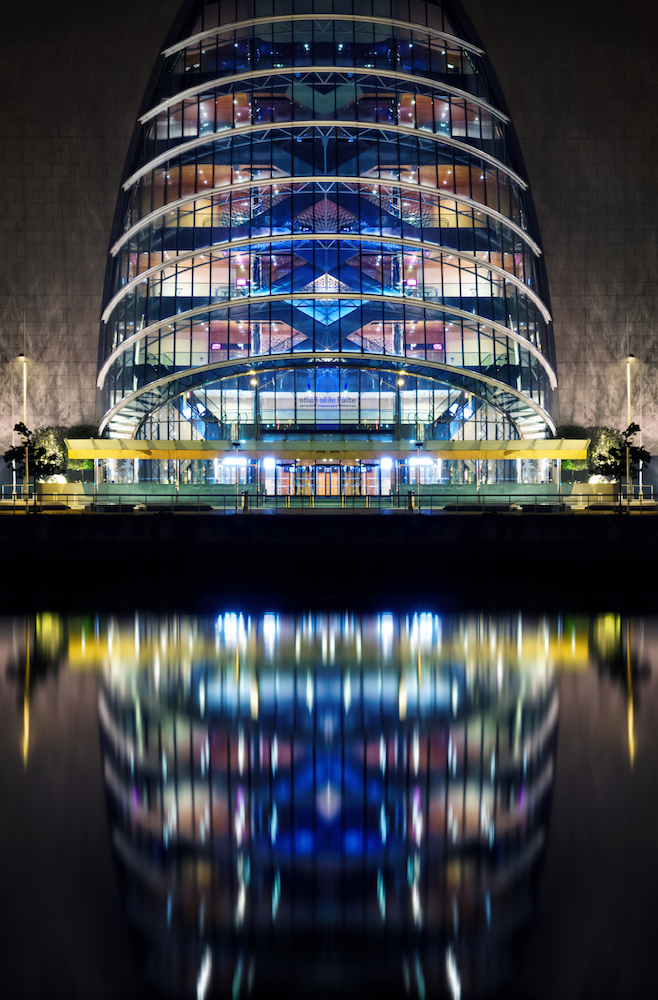
Here is the final image:

And here is the original:

There was a lot to do, so here is what I did to transform the rather ugly quick shot into a decent night picture.
Part One – Some initial cleanup
First I increased the brightness of the building and its reflection in the water. To do so, I created a curve adjustment layer. Then I used one of the Nik filters (tonal contrast) which gives the image a little more pop (1:15 min).
Part Two – Increase the brightness of the brights
I wanted more light where there is light. So, another curve adjustment layer (1:55 min) did that. To only brighten up bright areas, I double clicked on the layer and changed its blending options – have a look in the video, it’s a super useful function!
Part Three – Remove the colour cast
The whole image was a little red, so a simple colour balance adjustment layer made that go away. Begone red! (3:05 min). I repeated that later in the processing after I realised there is still some red in there.
Part Four – Mirror the image
There was some dirt on one site of the wall surrounding the building, so I decided to mirror it in the middle (4:00 min). So first, I made a stamp visible (CMD alt shift e) which copies everything visible onto a new layer. Then I hit M on the keyboard which selects the marquee tool. I made the selection and hit CMD J on the keyboard, which made a new layer out of the selection. Hitting CMD T, I then simply flipped it over and adjusted its position a little bit. I know it seems like a lot of buttons, but these shortcuts make processing so much more efficient! I’ll have them summarised further down for you.
Part Five – Blur the water
The reflection in the water was nice, but I wanted a little more blur. So, making a stamp visible first (CMD alt shift e), I went to filter-blur-motion blur (select something appropriate ;)). Then I created a layer mask (little Japanese flag at the bottom right), pressed b to get the brush, and painted black on the mask where I wanted to hide the effect – which was the building. Right after I also increased the saturation of the photo by creating a hue/saturation layer.
Part Six – Darken the edges
To draw some attention to the building, I wanted to darken the outer walls. So, here goes another curve adjustment layer where I (as above) used its blending options to make sure the effect is just visible in the already dark areas. Then I used the layer mask to remove the darkness from some parts of the building.
Part Seven – Add purple
Why? Dunno, I thought it might work well in the image 😀 So, colour balance adjustment layer, moving some sliders, and using the layer mask to remove the effect from some areas did it perfectly.
Part Eight – Add clarity
To make the image pop a little more, I created a stamp visible (CMD alt shift e) and went to filter-camera raw filter. There, in the basic tab, is an option called clarity. I recommend to try this one, the effect almost always adds a little goodness 😀
Part Nine – Remove blur
Sometimes it’s nice, sometimes it isn’t. I removed some of it which was in the building. It’s easy to get rid of, just make a stamp visible (CMD alt shift e) and go to Filter-Camera Raw Filter. There, find the Detail Tab and drag the slider for noise reduction to the right a little. Play around until all is well and the world is a better place.
Part Ten – Sharpen
So, stamp visible (CMD alt shift e), change the blending mode to Overlay and go to Filter-other-highpass filter. Go for a small amount (maybe 1px) and hit Ok. So, every time you copy this layer (CMD J), the image will become sharper. You can then group the high passed layers and make a layer mask to remove the effect where you don’t want it. All done, there goes another example on how to use photoshop!
Here are the most important shortcuts I used for the Photoshop processing
CMD alt shift e to create a stamp visible
B to get the brush
CMD J to copy a selection onto a new layer or copy a layer
D to get the default colours (black and white)
If you like my images, make sure to check out my complete portfolio! One step closer to learning how to use Photoshop!
Don’t forget to get out there and take some pictures yourself!