
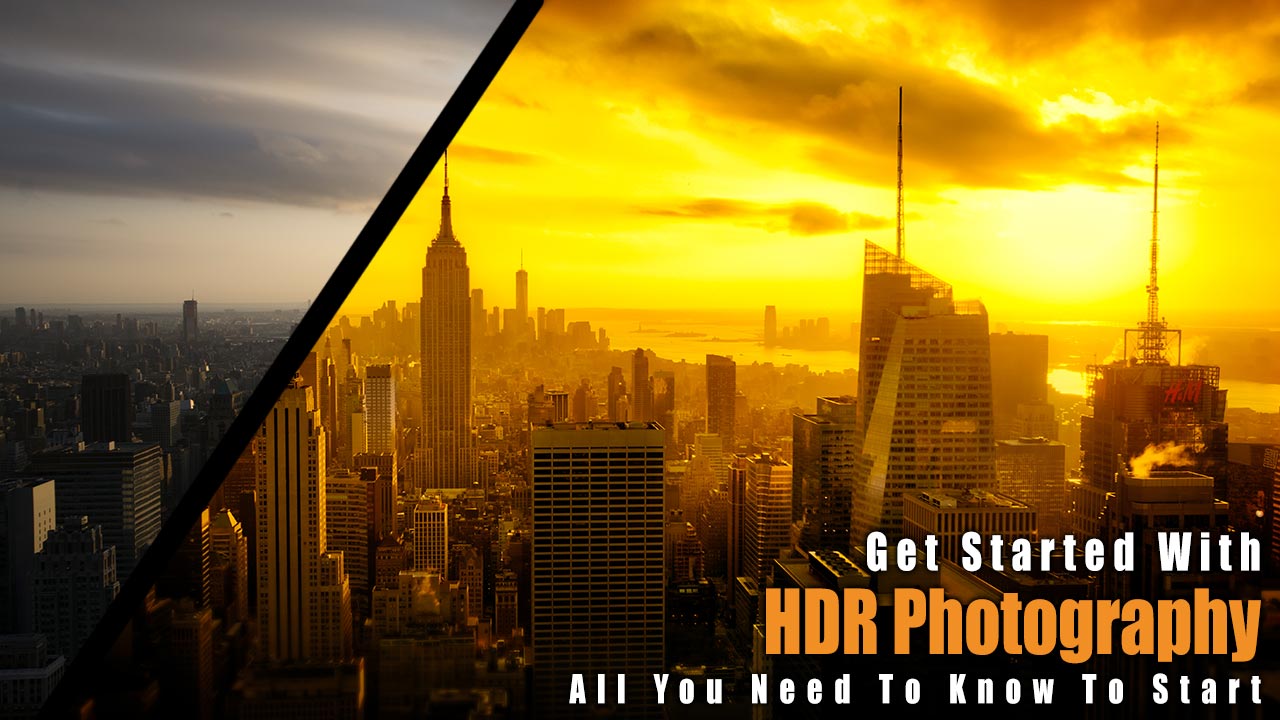
Get Started With HDR Photography
Welcome to my ‘Get Started with HDR Photography’ Guide, weary traveller! If you read this, you have taken a keen interest in what is called HDR photography – a specific way of taking pictures that has already drawn thousands of people in its inner circle. Everything that is written in this article is also in this video (you decide!):
About 85% of my own images are HDR photos – some more, some less obvious – and after creating tons of images I get the question as to how to get started with this specific area in photography more and more often. Therefore, I have put together this comprehensive guide that gets you from 0-100 in no time at all. You will learn what is the difference to “normal” photography, see HDR photography examples taken by yours truly and I will give you all the information you need to create your own ones. Note that this guide is written for beginners and I have stayed away from getting too technical to keep the most important aspect of Photography in mind – Fun! Let’s get started with HDR photography!
What is HDR Photography?
For those that have just heard about it and want to start to get started with HDR photography but never sniffed into the details of what exactly HDR photography is, we will start with understanding what HDR means and what makes it different to “normal” photography. HDR stands for High Dynamic Range. Here is a simple example what exactly this is all about:
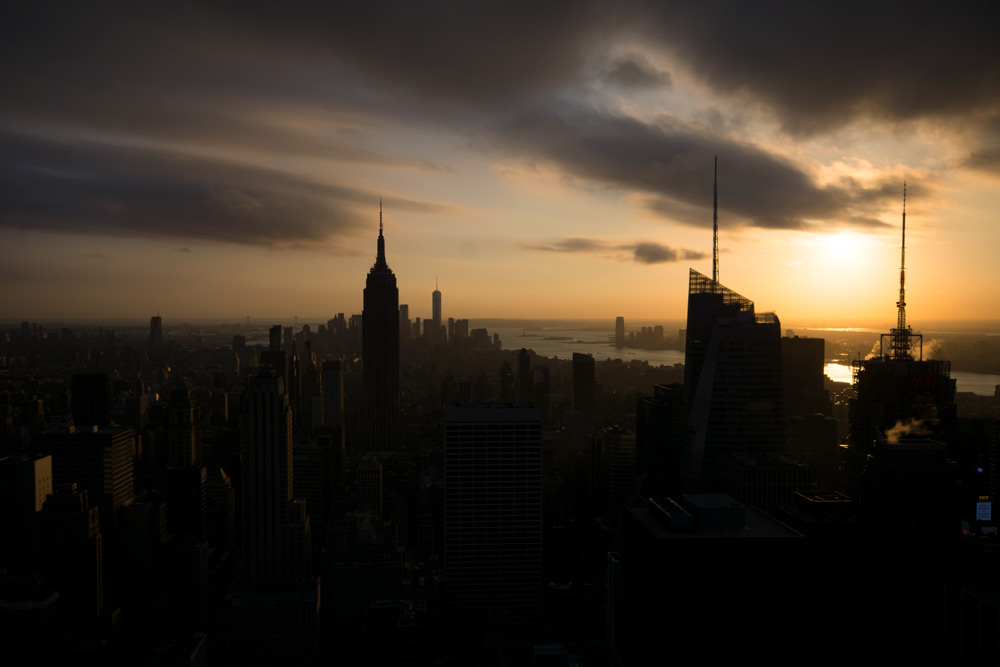
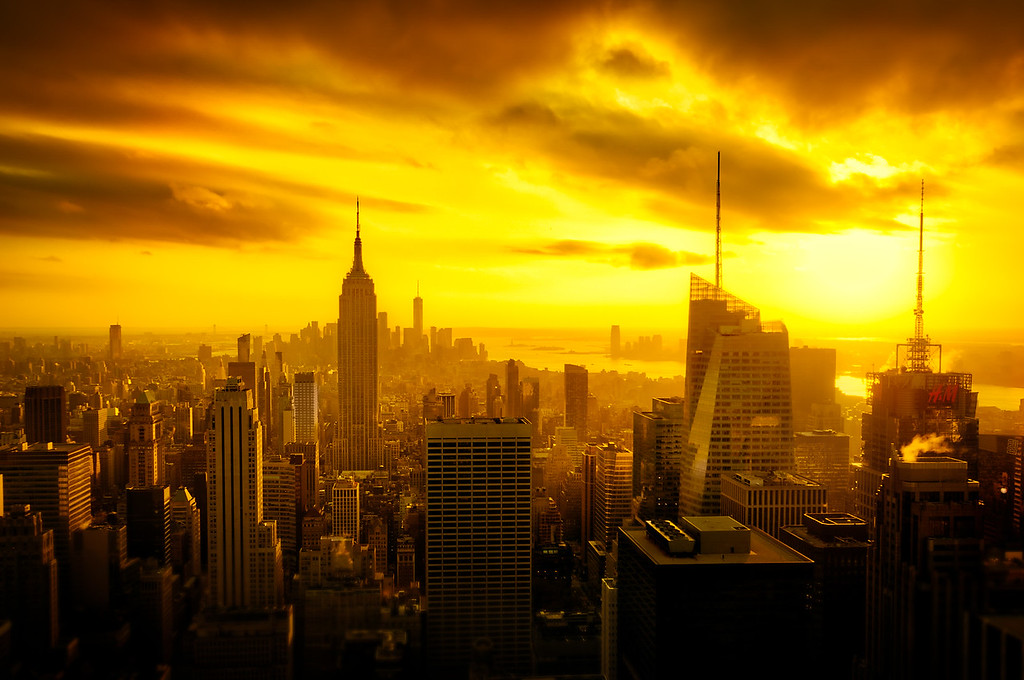
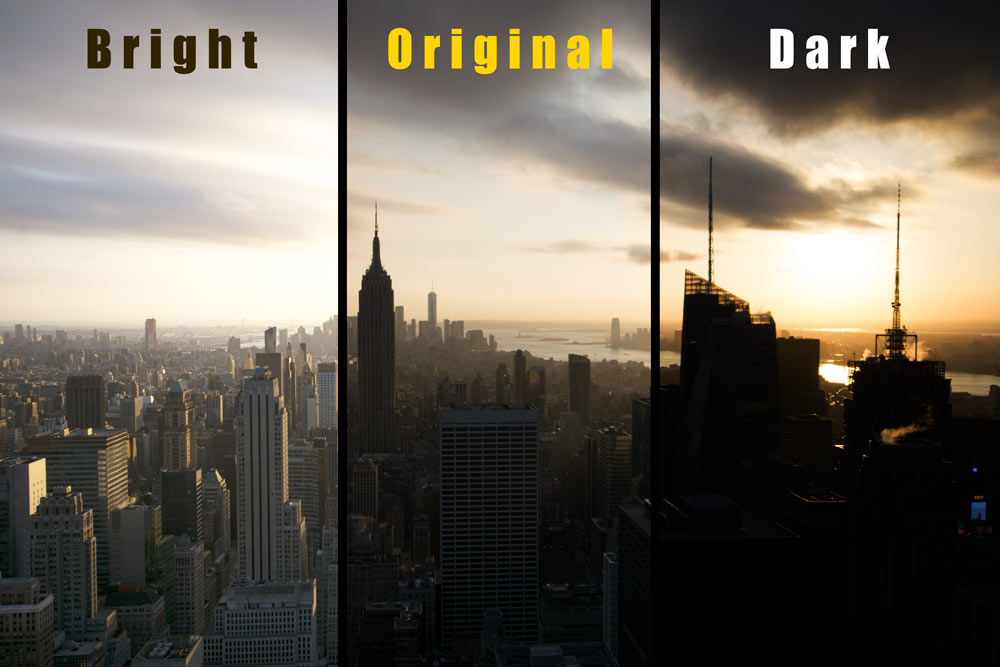
This is a picture of New York from the top of the Rockefeller Centre – but this is not super obvious, is it? In the above image, you can see the sky very well, the colours, the clouds… Looks nice, but the city itself is very dark and barely visible. This happens when you point your camera towards the sky and let it handle the light situation – your camera will try to make the area that you focus on “as best as possible”, meaning even though you photograph into the light, the clouds will be nicely lit.
Now, you could take this photo, go home and do some edits to it and that is it. Or not – have a look at the below image.
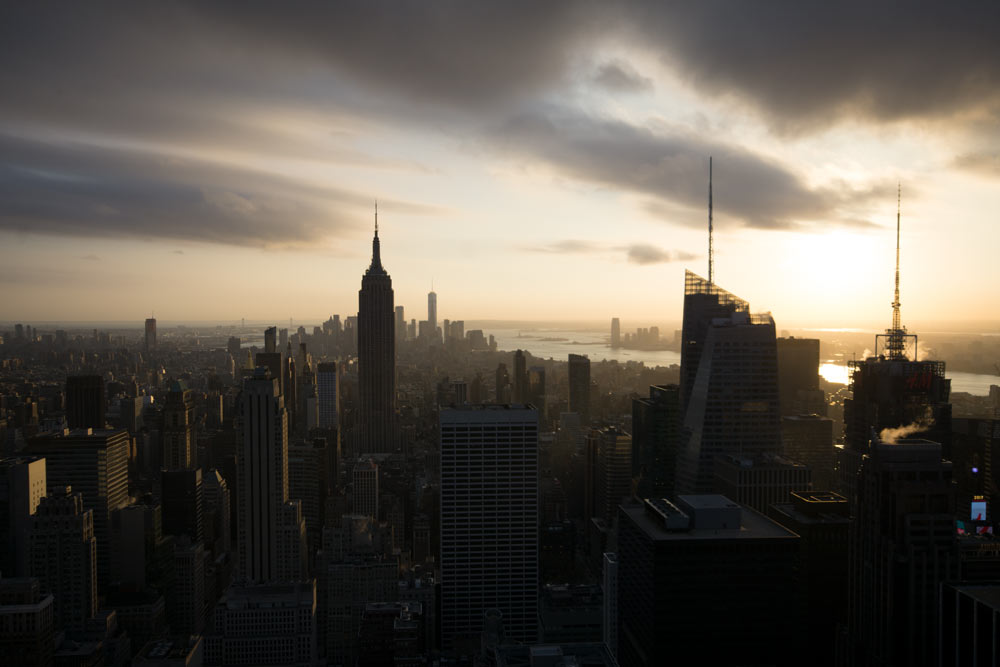
Same place, same time – but in this image, you can clearly see that this is New York as you can see the buildings! However, there is very little beauty in the sky and the sky is just blown out. This happens if you aim your camera at the city and let it do its thing.
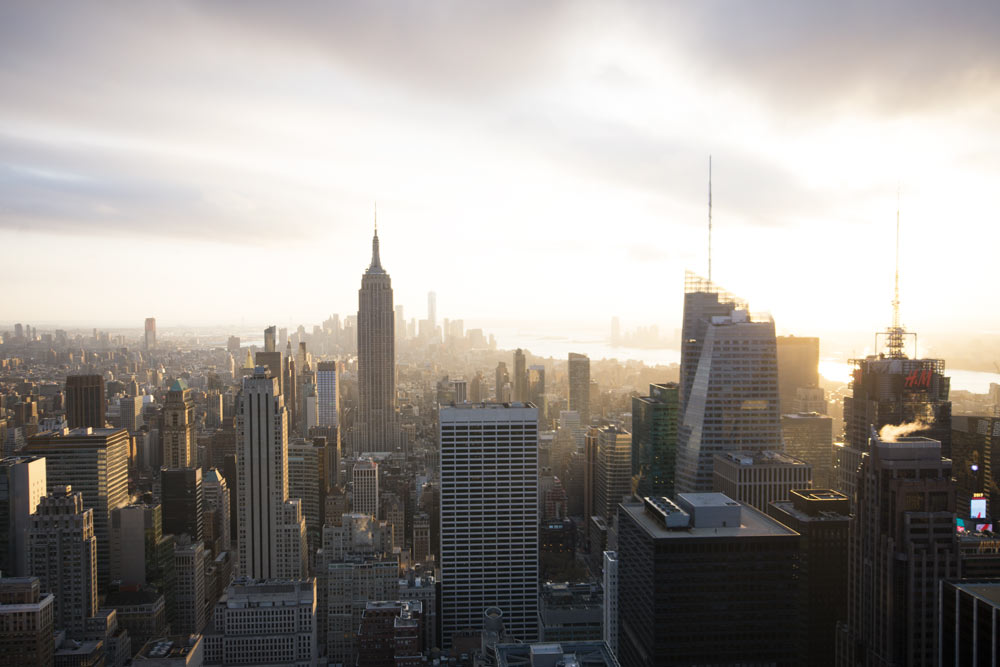
Or you can control the settings of your camera manually and get something in-between these two extremes above:
In this last image, you can see everything medium well – and this is what you would do in “normal photography”. You make sure the camera captures enough for you to work with and then do the rest when you edit the image (or not, if you are happy enough).
The above example is an extreme as the photo has been taken against the sun, but it is perfect to explain the basic idea behind HDR photography: if you have bright lights and dark shadows – or in other words a high dynamic range – and one photo cannot capture all the beauty of the scene, then you take separate exposures (just like the images above) and combine them into a single photo. This way, you get the best out of each picture: the nice clouds, the nice city, and everything in-between. That is the basis to get started with HDR photography.
Examples of HDR Photography
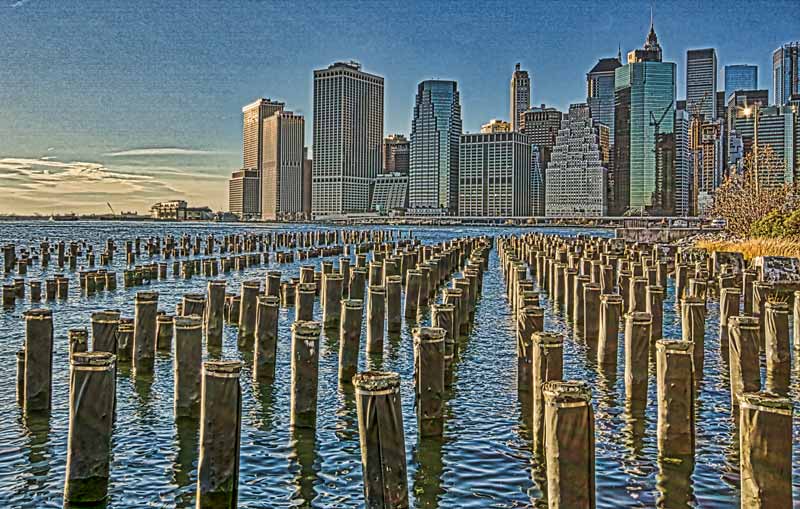
Now that the general principle of HDR photography is clear, here are some of my own examples to give you an idea as to what you can do, starting with the final image of the above New York example. Some inspiration to get started with HDR photography!
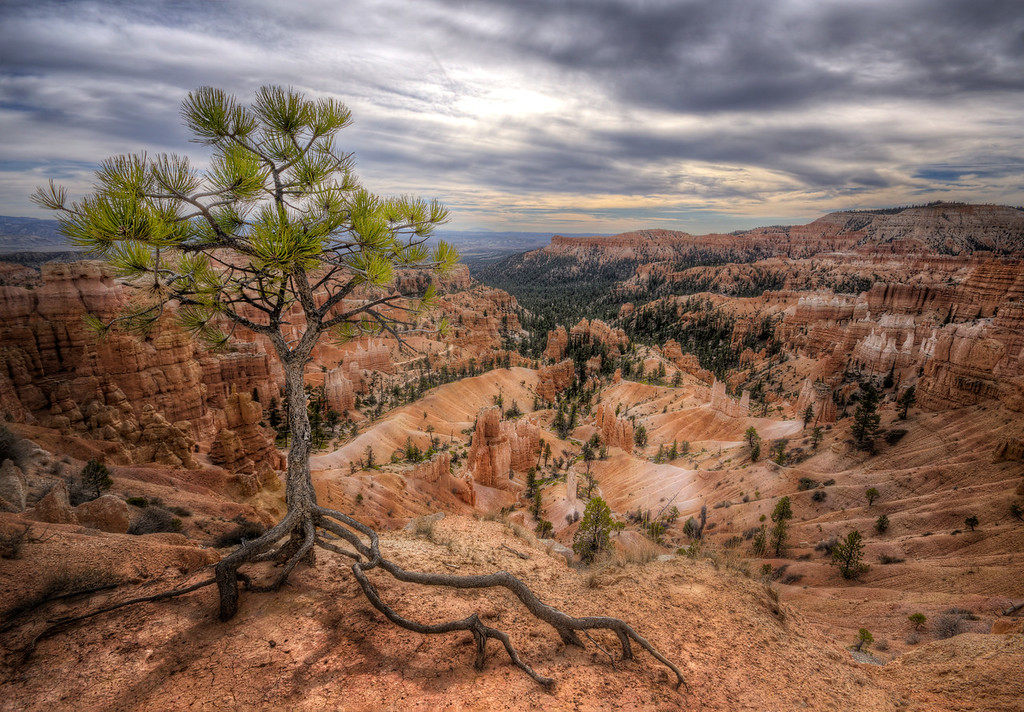


Now, these are my own images and I am a big friend of intense colours and contrasts, this is not something that you have to do – but you can! You can do whatever you want when you get started with HDR photography!
How to Prepare Your HDR Images
Now that we know that you need multiple pictures – usually three – with different brightness levels (or different “exposures”) to merge them into one single super image where you can see everything, let’s talk about how you can get these three images. For this, it is important to understand the principle of exposure compensation – a needed step to get started with HDR photography.
Think of it this way: Exposure compensation is a camera function that lets you brighten or darken a scene to your liking and is available in most common camera modes except manual mode.
For example, if you point your camera at something and look at the display, you will more or less see the image the way it will be saved later. If this image is too dark or too bright for your taste, you can change the exposure compensation setting on the camera to brighten or darken the photo – and you can see this right at your screen. Of course, there has to be some sort of unit that you can tell the camera so that it understand by how much you would like to darken or brighten – for exposure compensation, the camera uses “Stops” or “Exposure Value” as a measure.
In my initial example, the dark image would be for example darkened down two Stops (so “-2”), the middle one would be 0 and the bright one would be brightened up by two Stops (so “+2”). This is all we have to know about the technicalities, but if you want to learn more, check out this article that goes a little deeper.
If you are struggling to find these settings on your camera, check out this article of mine that will explain you the most important things, such as ISO, Aperture, Shutter Speed – and more.
Now finally, to take these images, there are two options:
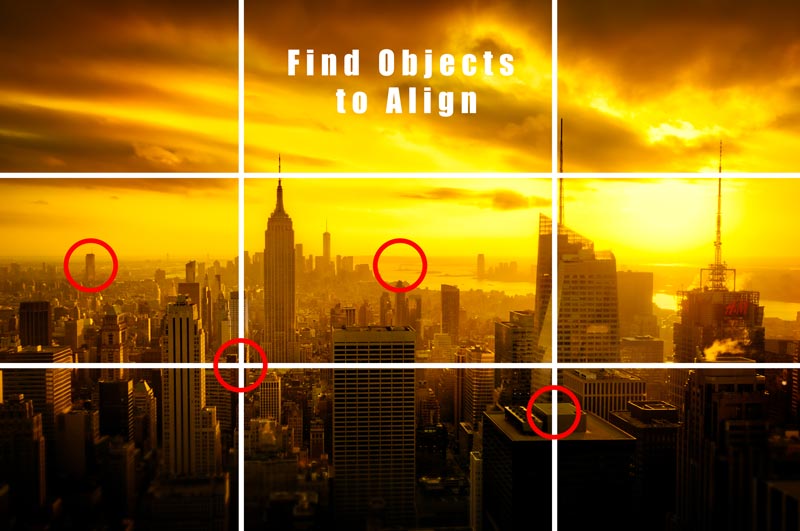
- Manual Bracketing. Bracketing is the process of taking multiple photos with your camera, where each image has a different setting (in our case, this is the exposure compensation setting (there is more behind this, but let’s keep it like this for now :))). Doing this manually means to take a photo without any exposure compensation, then go darker and take one and then go brighter and take one. I am sure you see the problem with this – if you take a photo, change a setting, take a photo, change a setting, you will not easily be able to shoot the exact same frame that you had shot before as your camera will have a slightly different position and aim for every shot. There are two ways around this:
- 1) Enable the grid in your viewfinder and place certain objects on the line or in the centre of the image (see image below). When you have changed the setting and aim at the target scene again, make sure you place the same objects in the same place on the grid. This is not perfect, but sometimes it just has to do. An example of how this could look like is in the image below. Option
- 2) Use a tripod to make sure your camera is steady between shots. If you can only do this manual, the latter is definitely what I would recommend.
- Auto-Bracketing. Many cameras nowadays have a setting called auto-bracketing. If you enable this setting on your camera, clicking the button to take a photo (and holding it) will take three images for you! This is awesome, right? Depending on the auto-bracketing that your camera can do, you can set how many exposures you want and how many stops you want to have in between them. Here you can find the settings you need for Sony Cameras, Canon Cameras, and Nikon Cameras (for Nikon it seems to depend a lot on the camera model, so make sure to check your manual also).
Perfect! So now we know how to get the images, let us have a look as to what to do with them.
How to Create HDR Images
Now we know how what HDR photography is and we have seen some examples – but how do you create HDR photos? Once you have this, you can really get started with HDR photography!
There are several options available to you. For a start, if you have a modern smartphone, then your own phone might be able to do it for you – did you know? If you are using a camera, then there is a good chance that the camera can also do it for you – if neither is the case, you can use specific software to create your HDR image. In this section, I will go over the most important and best options in that regard and link tutorials for every single one. Dive right in!
- In-Camera or with your phone. This is a great option if you are just testing the waters to see if HDR photography does anything for you and you wanna get started with HDR photography right away. Both the camera and the phone have modes that do the process of combining exposures for you. Here is some help on how to find these settings for Sony, Canon, and Nikon cameras (you might have to Google for your own model to see if it can do it though).
The limitation of this is that you will not have any say in the HDR outcome – the Auto HDR Mode will decide what looks good and what does not. - Lightroom. If you have never heard about Lightroom – it is a software that lets you organise your images but also has a very strong capability to edit them. Lightroom offers many basic adjustment possibilities and also lets you create HDR images. Here is a short video that gives you the jinx of it.
- Photoshop. There are only a few people that have not heard of Photoshop before. Photoshop is one of the most extensive editing software out there, and it is used by photographers, designers, marketers, and so on. Photoshop has two options to create your HDR – either you let the software handle the creation automatically (check this guide here), or you do it manually. If you choose to go through the manual process, then note that this might be a little more tricky and it would be a lot easier if you have some prior experience in using Photoshop. Here is a full guide on how to use what is called Exposure Blending in Photoshop, written by Photographer Jimmy McIntire. If you are starting with Photoshop, read my Starter Guide here!
- Photomatix. Here is where things get interesting – all of the above either does not allow great control over the HDR creation process or does the HDR photo “on the side”. Photomatix is a dedicated software that has been created with one task in mind – to create HDR images. I had used Photomatix in the past, but have since moved on to a different software that I will mention in just a moment – here are some great tutorials to get started if Photomatix sounds like it could be something for you.
- Aurora HDR 2019 (PERSONAL FAVOURITE). Just now, I mentioned that I moved away from other software – and the reason is Aurora HDR 2019. Aurora is a dedicated HDR software that only created HDRs. Having said that, here is the thing. I have tried all the options above and more to create HDR images. The tricky part of an automated process is that you rely on certain algorithms that decide how the HDR version looks and depending on what you use, the HDR will look different and sometimes simply bad. Using the manual way, the process of creating an HDR is lengthy and rather complex. Aurora HDR 2019 creates absolutely stunning images every single time I use it and common problems that I have encountered when creating HDR photos are solved simply or do not even exist. Here are several of my own posts where I show you how I use Aurora to create and edit my own images in combination with Photoshop or alone – check it out! Or check out this post where I had a sneak peek at the software and looked around when I initially started using it – it should answer any question that you might have.
If you thinking about buying Aurora, make sure to use the promo code “LETSIMAGE” at the checkout to save 10% 🙂 This is the software you need to really get started with HDR photography.
Creating an HDR Image from a Single Photo… or 10
A single photo? Didn’t I just spend about 1000 words explaining how to use three images – or three different exposures – to combine them?
I did, but here is an exception: Dedicated HDR software such as Photomatix or Aurora HDR can create what is called a “Pseudo-HDR” by using only one image. Here is how this works – the software will essentially use the information in the image, darken the highlights and brighten the shadows, and then create a fresh “HDR” version of the image. This process is called Tonemapping.
This works based on the information that is saved in the image – for example, if you shoot in the RAW format of your camera, then even the dark shadows and the bright areas have information in them that you can use. Considering the progression of cameras and the amazing quality of RAW files, often you can simply use a single RAW file to create an HDR and you are good to go. However, in more extreme situations, one single RAW file cannot save all the information in the shadows and the highlights, so the mentioned three exposures are needed. However, Aurora HDR (see above) does a great job of creating HDR photos off of one single image, so give it a try!
Beware – if you are posting your work in Facebook groups (or anywhere else, really) that have “HDR” in the name, you might be called out for posting Pseudo-HDRs made of a single image. HDRs that have been created from one image are technically not “true” HDRs. I personally would not worry about this when you take the picture, as sometimes you just have time for one image for whatever reason – but I thought I let you know that saying “this is an HDR image…” when it has been made from a single photo can get people to complain.
But what about creating an HDR image from 10 (or 5, or 7…) images? Well, if you have really really really dark shadows and extremely bright highlights, then there might be occasions where you want to use more than three exposures to capture all the information the scene has to offer with your camera. Another possibility is that you want to have a more gradual transition between your exposures, so instead of going down 2 Stops to darken your image, you might want to go down 0.3 Stops instead. Having said that, this is rather rare and I may have done it twice in my years – usually, most people are totally fine with three exposures. If you are using more images or plan on doing so, that’s totally cool if it serves your purpose though.
Mistakes to Avoid When Creating HDR Images
I have created many HDR images and I think I have come across every problem and mistake you can make on the way when you get started with HDR photography. So I thought I give you a short list of the most common mistakes I have made and I see many people make so that you know what to look out for. Most of them can be solved easily and I will put together a more comprehensive guide where I explain how to do so.
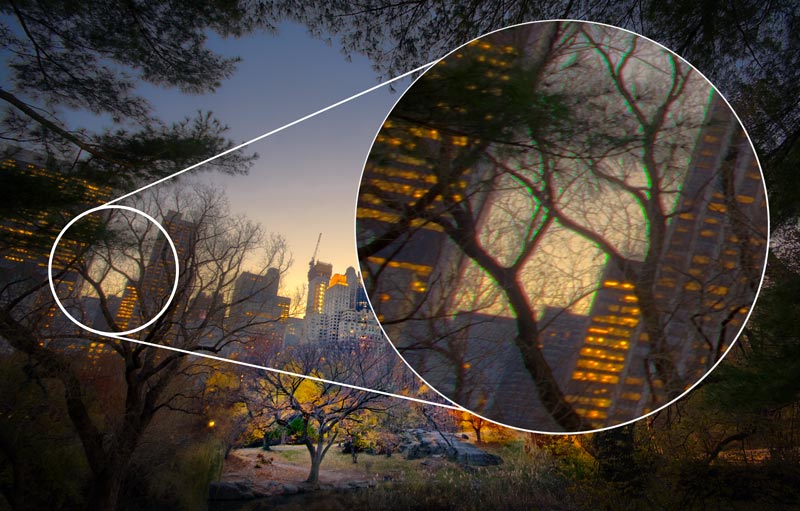
- Chromatic Aberration. This is one of the most common issues not just in HDR photography but in general. What is it? Have a look at the below image. The circle on the right is a zoomed in view of the left one. Do you see the green lines in the branches? That is what is referred to Chromatic Aberration. This stuff comes in purple and green mostly and some HDR software (like Aurora HDR) have a function to remove it.
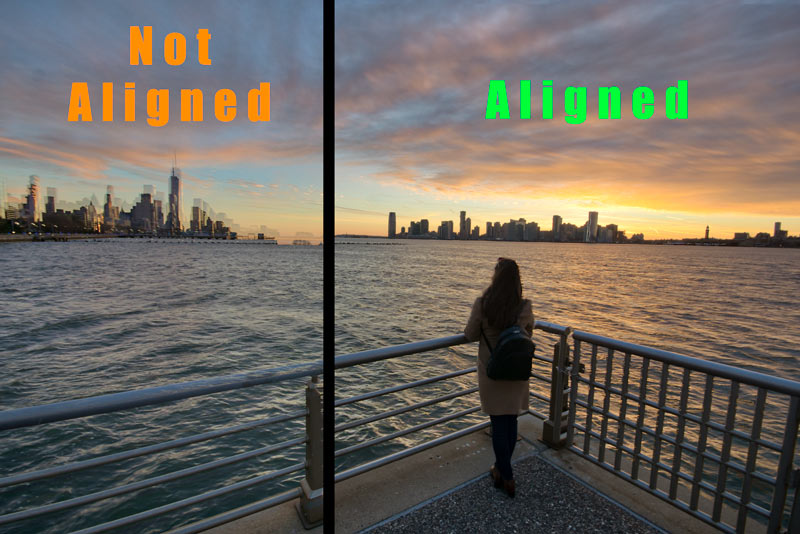
- Alignment. When you let software combine your images or if you do it manually, then make sure you look out for alignment problems – a common mistake when you get started with HDR photography. If you took your three images by hand and without a tripod, then there is a chance that each image is slightly different. Not aligning the images properly will make them look blurry and strange. Usually, it is the push of a button to get rid of this problem (so it is in Aurora HDR).
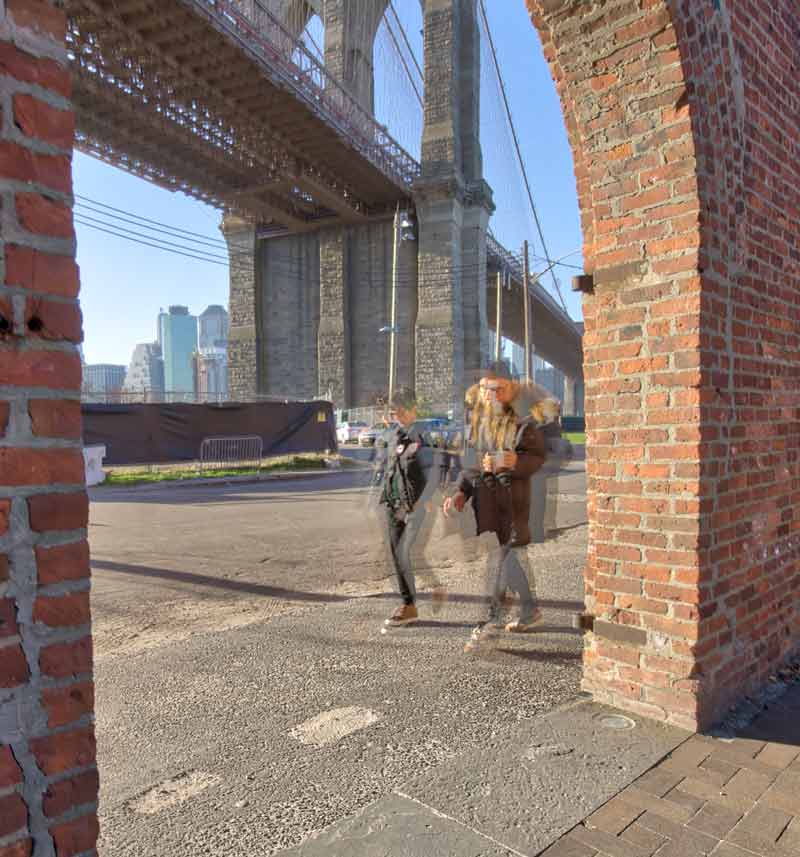
- Ghosting. I do not mean the process of eliminating all fear and hence become invisible for an alien species as suggested in the movie “After Earth” – in this sense, ghosting means that when you take your three images and you have moving objects in the image (like people, cars…) then they will have a slightly different position in each image. When you combine them, the below will happen. Some HDR software can balance this out totally – again, such as Aurora HDR (I mean it, it does it all!).
- The Typical HDR Effect. While most people consider it a mistake, there are those who like it and use it as a stile. When you use software to create HDR images such as Photomatix or Aurora, then you can go quite strong on the processing and create a very strong effect that could look like something like the below. These kinds of images have their own community and if you like this kind of processing then more power to you. Judging from what I hear and see, such strong processing is often considered too much and marked a ”common mistake’ when you get started with HDR photography, so feeding it to the wide public might not give you the best feedback. It might though, maybe your images are awesome and this is your thing, who knows!
- Noise. Combining images into one (or using a single one) to create HDR images can cause noise – the “snow” that you often find in images. Check it out – take a picture in a dark room with your phone and zoom in, you will see something like what you can see in the sky in the image above. Sometimes it does suit the mood, for example, if you have a really gritty black and white image, but most of the time you wanna make sure you remove it.
Anything else?
If you are looking for more excellent HDR guides and tutorials, make sure to check out stockvault here – they have an awesome repertoire on them!
What else is there for you? One thing, really… Go out there and try it out! HDR creation is great fun and can go in an artistic area whenever you feel like, so if nothing else it can be super fun – you will surprise yourself with how creative you can be, so get started with HDR photography
I hope you enjoyed this article about how to get started with HDR photography – do let me know if you would like me to add anything or if anything seems tricky to understand and I will gladly have a look. Otherwise, you can also drop a comment here or below the video on the good old YouTubes to say hello! Talking about YouTube, why not hit the subscribe button to stay tuned for weekly Photography and Editing tutorials? You can only win 🙂