Welcome to Your Full Guide To Luminar 3! If you are looking for an alternative to Lightroom, are curious about what Luminar 3 with libraries can do, or just started out and are in search of your first but awesome editing software that is user and beginner friendly – whatever brings you here, you are in for a treat.
Luminar 3 is a photo editing software that has a library function. That means, you will be able to organise your photos and edit them in one simple-to-use software. In this review, I will go over everything – interface, keyboard shortcuts, capabilities and functions, examples, workflows, and more. If you are a beginner or a pro – this is your your full guide to Luminar 3. Watch the summary video or read through.
Links You Might Need
- Here is the Luminar 3 Homepage
- Save 10% on Luminar 3 using this link and promo code “LETSIMAGE”
- Here is my Luminar 2018 Review
- If you are just starting out in Photography, check out this ultimate guide to get to know your camera.
The Library Interface of Luminar 3
The Library interface of Luminar 3 is very simple and easy to use – you can break it down into 3 sections.
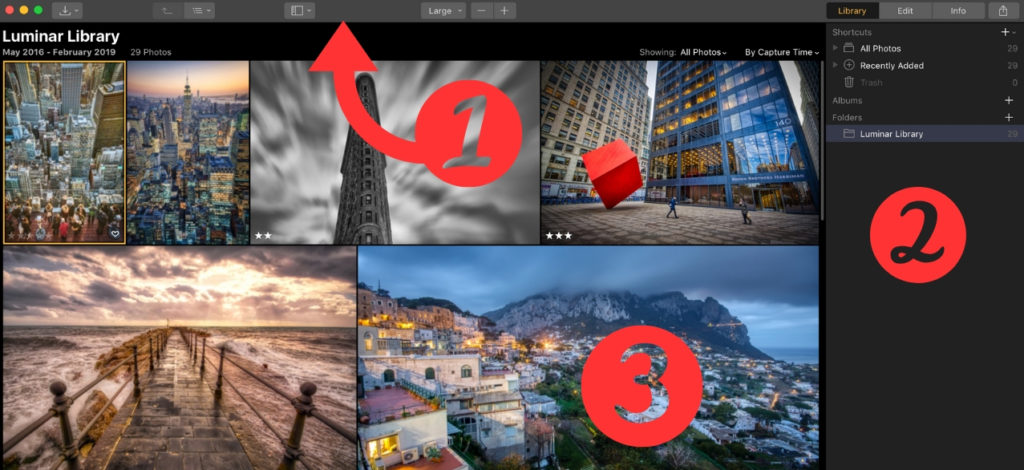
1 – View and Organise
The top bar can be used to navigate between folder levels, zoom in and out of the image, import images to folders, or select images for a quick edit (more about this later). You can also set the size of the image thumbnails that you see in section 3.
2 – Library, Edit, Information
This is one of the main sections that you will use A LOT. We will go into each section in more detail below – for now, the Library is used to organise your photos into Albums or Folders, the Edit pane is used for applying any edits to your photos, and the info pane shows you information about the photo you have selected/are editing (such as ISO, Aperture, etc.).
3 – Your Images
If you are in the Library mode in section 2, you will see thumbnails of the photos that you have imported into Luminar 3.
To use Luminar 3, it is better to look at it from two different points, the Library function and the Editing function. To get the full view, we need to look at both and as this is your full guide to Luminar 3, let’s do it! You will also see way more options appear in Section 1 once you switch to the Editing pane.
The Library Function in Luminar 3
When you first open up Luminar 3, there wont be any images in it. We will start by looking at how to get the photos into Luminar, how to organise them, and how ultimately get to the editing part (I know, you are excited).
Importing your Photos into Luminar 3
In many softwares, you need to properly import the photos for the software to be able to work with it. This is not great as you will have the images as files AND the library of your software that also has the photos in it – a lot of hard drive space is used this way. Luminar is different.
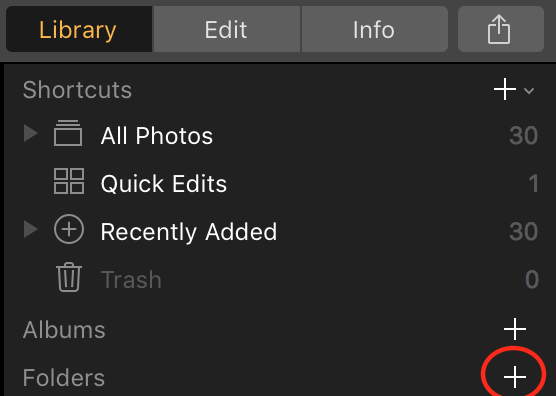
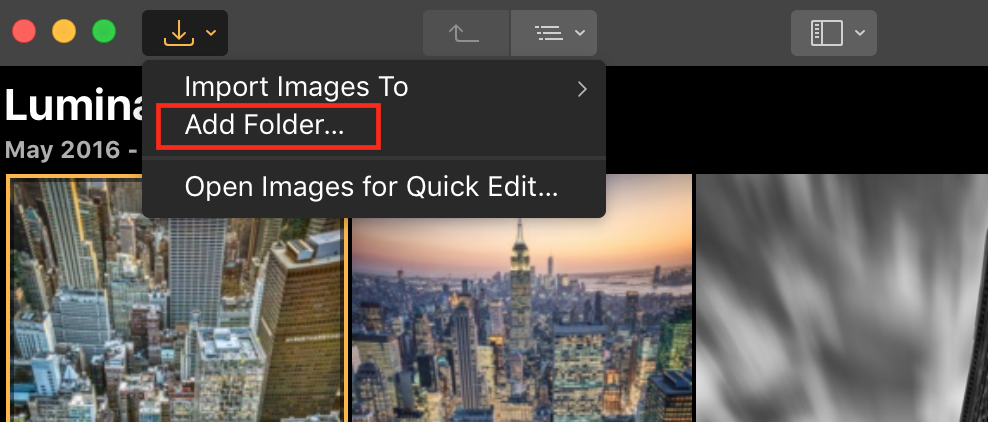
All you need to do is to make sure you are in the Library pane on the right hand side (Section 2). You see “Folders” and a little “+” symbol. Hit it.
Alternatively, you can also add a folder from the top bar:
On your computer (or on a hard drive, pen drive, even a cloud), find the folder that has your photos in it. Select it and it will appear within the right hand side panel. Once you selected the folder, the photos that you have in that folder will appear in Luminar 3 (in Section 3). Congrats, you have now imported your photos! Luminar will not create a separate library but instead have a direct link to anything in that folder.
This means, if you add or delete photos in the folder, they will automatically appear or disappear in Luminar – in real time! You can add as many folders as you need.
Now that your photos are in Luminar, lets have a look as to how to organise and sort your photos and get on with your full guide to Luminar 3.
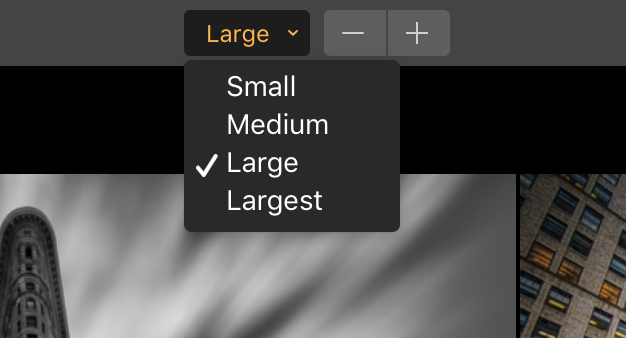
Adapt the View of Your Library
You might want to change how you see images once you have added a folder. You can easily do that by using the top bar and change the thumbnail size (change the drop down or use the plus/minus symbol).
View and Sort Your Photos in Luminar 3
Depending on how you work, you might only have one folder and drop all your images in there (I do!). In any case, you will need to sort your work in a way that makes sense. Here are the sorting options you have.
For a starter, you can select which images are shown to you. We will get into rating and labelling a little later, but you see you can be pretty specific about which images you want to see.
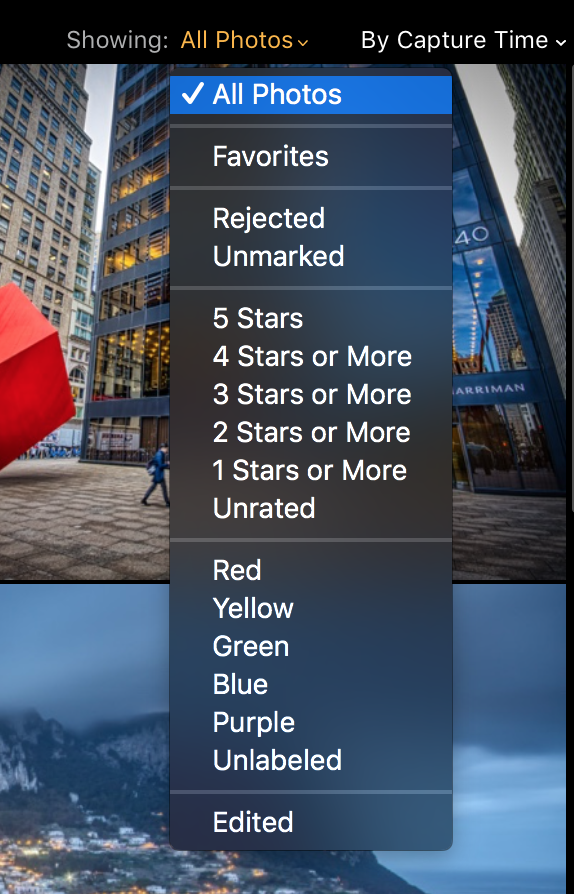
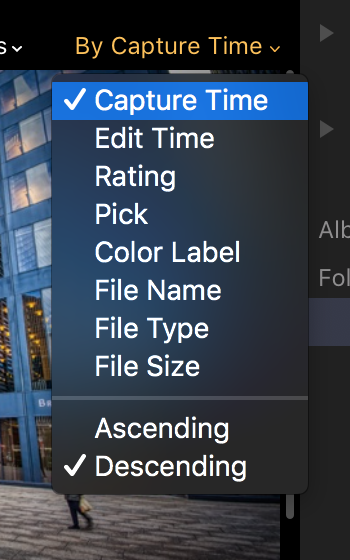
When it comes to sorting, you again have a variety of options available. From capture over editing time to even file size – choose what you will!
Now that you have seen how to get your photos into Luminar 3 and how to sort/filter them, lets have a look as to how editing works and what you can do, moving aling with your full guide to Luminar 3.
Editing Photos with Luminar 3
The truth is, you can do A LOT with Luminar 3. I could write about so many things here – the adjustments, the layer system, the blend modes, … but this would make this article so endlessly long!
Did you know that Luminar 3 had a previous version, called Luminar 2018? The thing is, Luminar 2018 did not have Libraries at all! However, editing is very similar compared to Luminar 3.
Therefore, instead of re-writing everything here in your full guide to Luminar 3, check out my complete guide through Luminar 2018, where I show you all the editing possibilities and adjustments that are just as valid for Luminar 3. Below, I will only throw in some highlights to get you hungry for more and dig into the interface when in Editing pane.
Layers in Luminar 3
Layers are something that most only know from professional software such as Photoshop. However, Luminar 3 has them as well – giving you the flexibility of adding your adjustments only where you like and need them.
Blend Modes
Once more, Blend Modes are known from Photoshop – but are rare in other software. Luminar 3 lets you use Blend Modes and Layers as you would in Photoshop! For PS users, this is great as it will be easy to start – but for beginners, it is great to get used to Layers and Blend Modes in a very user-friendly software!
Endless Adjustments
Luminar 3 has over 50 adjustments available for you to use. This is a lot! From “basic” options such as curves and HSL, to more creative options such as sun rays or Matte Effects.
Work Faster with Looks
Luminar 3 has a humongous number of presets – called “Looks”. With one click, you can completely change the look of your photo and then take it from there to adjust it further, if you want.
If you want to learn more about the specific adjustments and layers in Luminar 3, check out my article on Luminar 2018 – the editing in both versions is close to the same. Moving along with your full guide to Luminar 3, let’s have a look at the Editing Interface.
The Editing Interface in Luminar 3
Once you move from the Library to the Editing Pane, the interface will change a lot! If you want to switch over fast, just hit “D” on your keyboard (D stands for Develop). Let’s break down the Editing interface of Luminar 3.
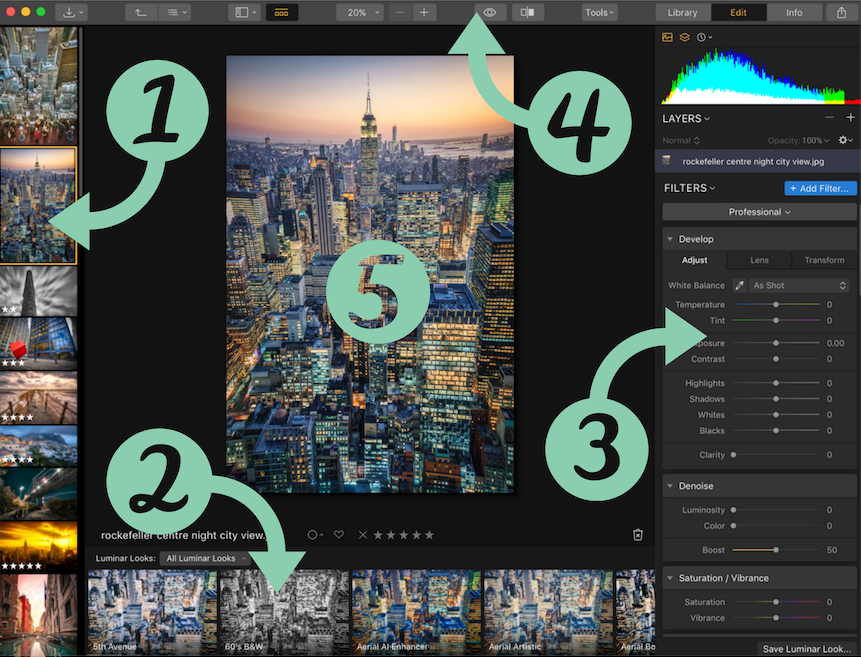
1 – Your Library | This is a feature that I really love. Even in editing mode, you can see your Library Images in the side bar on the left. Click through them as needed – no need to switch back between Library and Editing Pane all the time! The image you select will be the image that you edit.
2 – Luminar 3 Looks | These are essentially presents that you can apply into the image that you are editing. Just scroll through the little thumbnail and select the one you like. The editing pane (Section 3 in the image above) will take the settings over accordingly.
3 – The Editing Pane | Here is where you actually edit the image. Create layers, add adjustments, use gradients, and so on – this is where it happens.
4 – Top Bar | Some more options are now available compared to the Library Mode. In addition to Zoom into/out of your photo, you can select Tools (Crop, Erase, etc.), activate the before/after comparison, disable the Looks pane, and more.
5 – Your Image | This is the image that you are editing. Any change you make will update live here, just how it should be.
Understanding the library and the editing window is great! But lets look at some unique functions and workflows that will help you speed through your edits like a boss. Only fair as this is your full guide to Luminar 3.
Luminar 3 Features That Speed Up Organising and Editing
Rate and Label Your Photos
When you import your photos, you might want to rate them to select them faster for editing. You can easily do that – right click and select a star rating or a colour label.
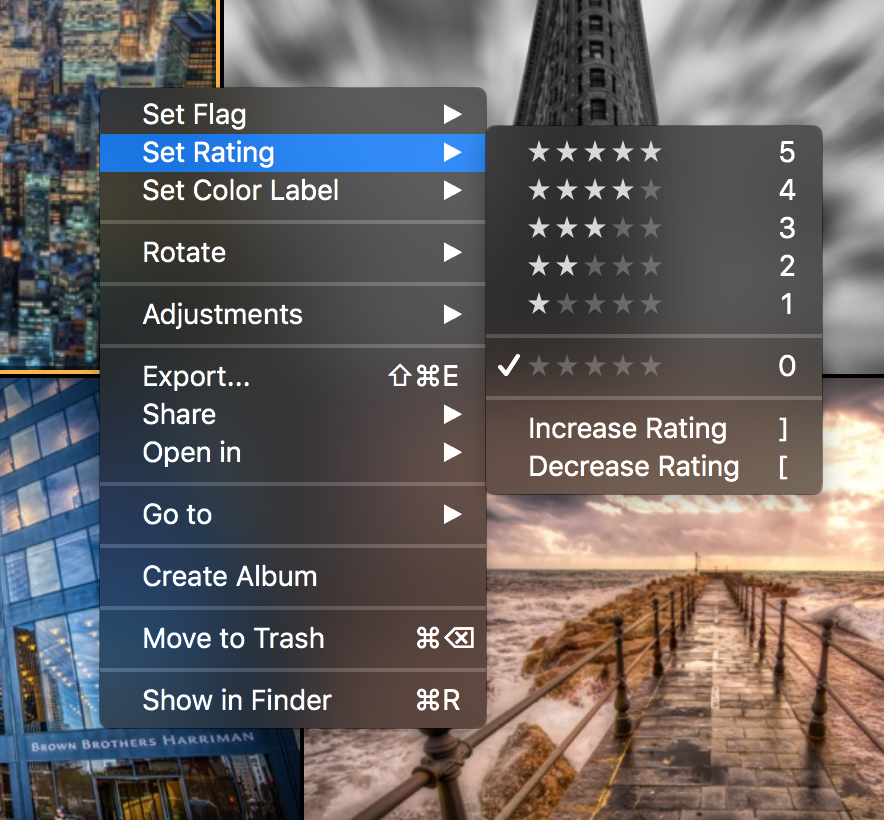
If this takes too much time for you, just click on the image and use your number keys on the keyboard to apply the star rating.
Find Photos from the Same Day
Another great feature is to find the photos from the same day as the one you select. Just right click and select it like so:

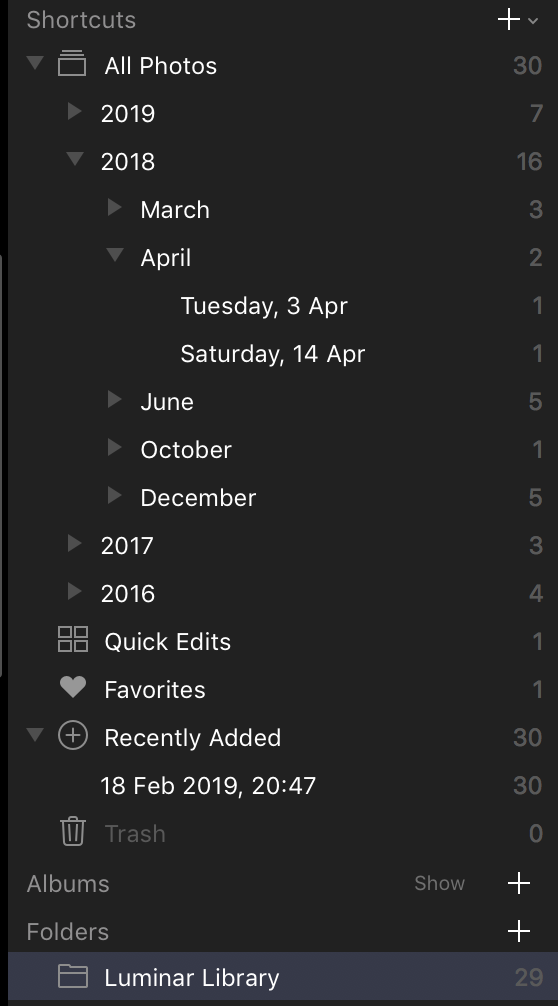
Navigate With Ease
On the right hand side within the Library Mode, you will find a great tree structure to find images from certain dates. Sorted by Year, Month, an Day, you can navigate quickly and find what you need.
Use Keyboard Shortcuts
Here are some great shortcuts for your editing – you will not believe how fast you can fly through the edits!
- When you are in the Library Mode, select an image and hit a number key form 1-5. This will apply the star rating according to the number.
- When you are in Library Mode, select an image you want to edit and hit the “D” key.
- In Editing Mode, select the “G” key to jump back to the Library.
- Hit the “I” key to jump to the Information tab.
- Hit “P” to favourite a photo – you can then select to only see your favourite images in editing/library Mode.
- In Library Mode, move through your photos fast using the arrow keys.
- Reject images fast using the “X” key. You can then throw them all in the trash and delete them right form within Luminar 3.
Edit Without Adding to the Library
This wouldn’t be your full guide to Luminar 3 if I wouldn’t tell you this: Until now, we have had all images in the Library. Sometimes you might need to edit an image that you do not want to import. No problem! Select the top left drop down and click on “Select Image for Quick Edit”. You can then select a photo, edit it, export it, without cluttering your library with things you do not need.
Albums in Luminar 3
You might wonder if you need 23423 folders and sub folders if you want to stay organised. The answer is no, you just need Albums. An Album is simply a place where you collect images for any reason – a specific job, a client, travel, holiday… You name it. I have all my images in one folder and create albums if I need to categorise them further.
Questions I know You Need Answered
Is Luminar 3 better than lightroom?
Yes. And No. This is a personal question that many people might disagree with – I say Luminar 3 is better than Lightroom. Photos are tracked properly when moving content, it integrated with Photoshop and Aurora HDR, it is lightening fast and simply slick, no subscription needed … Anyway, without starting a dispute, I think it is better. This is your full guide to Luminar 3 though, so you can always make up your own mind!
Should you upgrade from Luminar 2018?
Yes you should, its free to do so! Nothing more to say, hehe.
Is Luminar 3 for Editing Beginners?
Yes! It will take you no more than an hour to have a great understanding about what you can do. The layout is simple, intuitive, fast, and slick.
Can I see some examples please?
Sure you can, here are some photos that I used Luminar for in one way or another. Note, that I am using Luminar together with Aurora HDR 2019 as well as Photoshop – but for your full guide to Luminar 3, I need to show you where you can go with it!


How can I get Luminar 3?
You can get Luminar 3 here for 69$/€. Use the promo code “LETSIMAGE” to save 10%!
What if I dont like it?
You have a 60-days money back guarantee, so if you really don’t like it, just make use of that.
Will I need to renew a subscription or anything?
No. You buy Luminar once and use it as long as you like. Like a new coffee machine, just with more creative power.
Anything Else?
Not really. Get it and use it, you will not regret it! I hope you enjoyed your full guide to Luminar 3 – if you did, let me know in the comments and share this article with people that might be interested.