
Understand Your Camera – Shutter Speed, Aperture, and ISO
Welcome Photography friends! If you read these lines, you have decided to take the next step to boost your skills and, moreover, open up a massive skillset that you can utilize to take great pictures that will make people Ahhhwww – by understanding your camera.
On this ever-evolving page, I will guide you through understanding the most important aspects of your new (or old) camera – focusing on the big picture without going too deep into the technicalities of things. Therefore, for now, there are three things that you NEED to understand to boost the methods available to you – Aperture, Shutter Speed, and ISO. We will also jump into the manual mode for a moment to get you going.
Why these? Well, once you understand every single component and how they interact, you will be able to completely control the look of the image you take and understand your camera. No repeated focusing anymore because the camera does not do what you want, no more “it’s too dark for my camera”, no more “the picture is shaky and I do not know why”… all of this will make sense and you will know what to do to help these situations. So, here I will summarize each of these three aspects of your camera, but do not hesitate to click on the appropriate full article if you need more detail. Let’s start – painless, relaxed, and beginner friendly.
Your Camera And Its Buttons
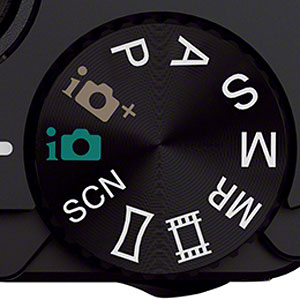
Guessing that you have just gotten yourself one of these electronic masterpieces, you might find tons of buttons on the camera – top, side, front, everywhere! Now, while all of these indeed fulfil a very important function, for now, we will concentrate on the dial on the top that looks like something like this on a Sony or a Nikon camera to get you to understand your camera (image source):
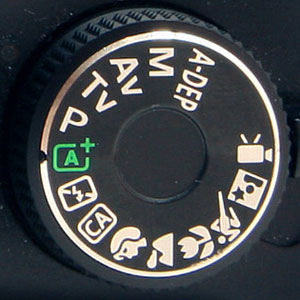
Or a Canon camera (image source):
This dial determines what mode your camera is in. Until now, this was likely set to “Auto”, right? That’s totally Ok and actually wise! Before jumping into each function of a camera, it is advisable to get a feeling for it first. Zoom in and out. Simply take pictures. Perfect start!
Inspect the dial a little closer. While it is full of symbols, for our purposes we will concentrate on the PSAM part. That is the P, S (Tv), A (Av), and M. Each of these letters stands for a different camera mode:
- P – Programmed Automatic Mode
- S – Shutter Priority Mode
- A – Aperture Priority Mode
- M – Manual Mode
We will ignore the P mode for now and concentrate on SAM – in this order. While I will keep things short and easy here, feel free to go to the full article of each section that is linked below to learn more. Oh, I will place the ISO in between A and M below because I think it makes sense, hehe.
The Shutter Priority Mode
What is the Camera Shutter?
To understand the shutter priority mode on the way to understand your camera, it is first important to understand what a shutter is. Each camera has a sensor – this sensor is the thing that ultimately takes the picture. In essence, when light falls on the sensor, it will transform this light into an image that is saved in your camera. The shutter can be imagined like a wall that is in front of that sensor. As long as the shutter is closed and you don’t push the button to take a picture, no light reaches the sensor and no picture will be taken. When you switch the camera on and you see the preview of the image on the screen or through the viewfinder, that is exactly the situation – the shutter is closed so no image is being taken while you compose the shot and manage the settings. When you “press fire”, so when you take a picture, the shutter will be released and the “wall” in front of the sensor will move out of the way – light can now reach the sensor, the picture is being taken. Once done, the wall, or the shutter, moves back into place and blocks the light from reaching the sensor – until you hit the fire button (or the “shutter release”) again.
Here is a really cool video that shows the process of the shutter closing in slow motion! Check it out:
What is Shutter Speed?
Now that we know what the shutter is and what it does, what exactly is shutter speed? Well, the shutter speed determines how long you take the picture. In other words, the shutter speed determines how long the sensor is exposed to light.
In the shutter priority mode, you will be able to control the time the picture is being taken (the shutter speed), while the camera takes care of other settings for you. For now, this shall be enough – if you want to learn more about shutter speed to understand your camera, read on here.
The Aperture Priority Mode
What is an Aperture?
While the aperture might be a little foreign if you have never heard of it, once you understand what you can do with it you will love it! So what is it and why do you need it to understand your camera? Earlier I mentioned that your camera has a sensor which is the part that will ultimately record your mage. Well, but how does the light get to the sensor? The light has to enter the lens, needs to be funnelled down to the sensor and can only then be used to create a picture. But… is there nothing that determines the amount of light that can go through the lens? There is – the aperture. The aperture is essentially a gate that controls the amount of light that can enter the lens. If the gate is just opened a little bit, then only a little bit of light can reach the sensor, whereas if it is open fully, a lot of light can pass through the lens. I have some more examples in the long article that is linked below if you want 🙂
What is the Aperture Priority Mode?
In this mode of your camera, you will be able to control the amount of light that enters the lens. Depending on the lens, you can let a lot of light in or not so much – all of this depends greatly on the situation and I elaborate way more in the long article – but the cool thing is that the aperture is the thing to use if you want to create these cool images where the background is blurry and the person (or any other foreground that you might have) is sharp! For that alone, it is worth to get this nailed haha. So, to dive a little deeper and to understand how to use this mode properly and what the units are and so on, read on here.
ISO
The last of our big three is ISO. While shutter speed and aperture might have a ring to it that makes it a little easier to think of something – anything – when you hear them, ISO does not sound familiar at all to most people when they try to understand your camera. I even heard people saying that they always leave it at auto – so here is the thing: ISO is very important and super useful and once more, once you know what it means, you will love it. So what is it?
Remember, when we talked about shutter speed, I mentioned that there is a sensor that uses the light to capture the actual photo. Here is the awesome thing – the sensor can be made more or less sensitive to light! With a high sensitivity -or a high ISO – the sensor can capture an image quickly. If the sensitivity is low – low ISO – more light is needed for the sensor to take the image.
ISO is not a camera mode, it is a setting that can be changed in shutter priority, aperture, and manual mode (see below). While you can change the ISO at any point in time, it comes at a cost I am afraid 🙂 If you are hooked and wanna learn more, read the full article just here.
The Manual Mode
The big M. Most people, including me, are very hesitant to use the manual mode to take their images – even though there are people out there that say something along the lines of “you can not be a photographer if you do not shoot in manual mode”.
You may ignore these people. It is perfectly fine not to use manual mode until you have an idea about aperture, ISO, and shutter speed, and you really understand your camera. Even then you might not need it as explained in the proper article below. Long talk – but what is the manual mode?
Well, let’s say you shoot in aperture priority – then the camera will take over the shutter speed settings for you. If you shoot in shutter priority mode, the camera will take over the aperture for you. In manual mode, you have control of all the settings your camera has and the camera won’t do shizzl to help you out. It’s manual. It’s all you.
This is great once you understand the interaction between aperture, shutter speed, and ISO, but not before. Having said that, it is also a great way to check if you got everything 🙂 Interested in more information about the manual mode? Read right on here.
Anything else?
These were the big three on the way to understand your camera – Aperture, Shutter Speed and ISO. There are of course more things to a camera such as white balance, different modes and more, but once you have gotten the hang of these three you are good to go to take pictures in a way that you want – not the way the camera wants it as in auto mode. The only thing left for you is to get out there and take thousands of pictures! I suggest to try each mode – Shutter Priority, Aperture Priority, and Manual Mode for several images until you feel comfy using them. Then it is all you 🙂
What is Next?
After you have gotten to understand your camera and once you have your images, you will most likely start to edit them if you have not done so already. I am currently preparing a proper resource for you where you can look up the most used editing software, tutorials on how to get started, and examples to inspire. I will update this page once done!
Also, you want to think about creating a proper portfolio for yourself. For that, I am also currently preparing an article for you where I show you some of the options available to you. I let you know once done!
Otherwise, if you enjoyed this article, make sure to hit the sub button on the YouTubes here to never miss a photography or editing tutorial ever again 🙂