
All About The All New Luminar 2018 Photo Editing Software | Luminar review
There are a great many photo editing programmes out there – but how do you choose which one is the right one for you? Well, you read reviews! In this post, I will tell you everything you need to know about Luminar 2018, a slick looking versatile little software that can help you to create incredible photos. I will lay down all the information that I believe might be interesting to you, from the interface over to detailed examples to the single features that are available. So, let’s jump right in, shall we? Note that I have tested the software on a Mac and not windows – but Luminar is available for both.
Long Story Short
Luminar 2018 is a photo editing software that allows for basic and creative editing of your images. The software comes with a variety of basic functions and filters (light management, contrast adjustments and so on), a vast amount of presets, but also very advanced functionalities such as layers and masking. With its sleek design and great tutorials the software is well suited for beginners, but also editing veterans will find joy in using the programme due to the availability of brushes, gradients, tablet integrations and way more. Interested? Read on.
The Interface of Luminar 2018
Some editing programmes have a rather complex interface – such as Photoshop for example – but Luminar offers a simple yet powerful interface with a clear structure and simple orientation. Let’s have a look at it:
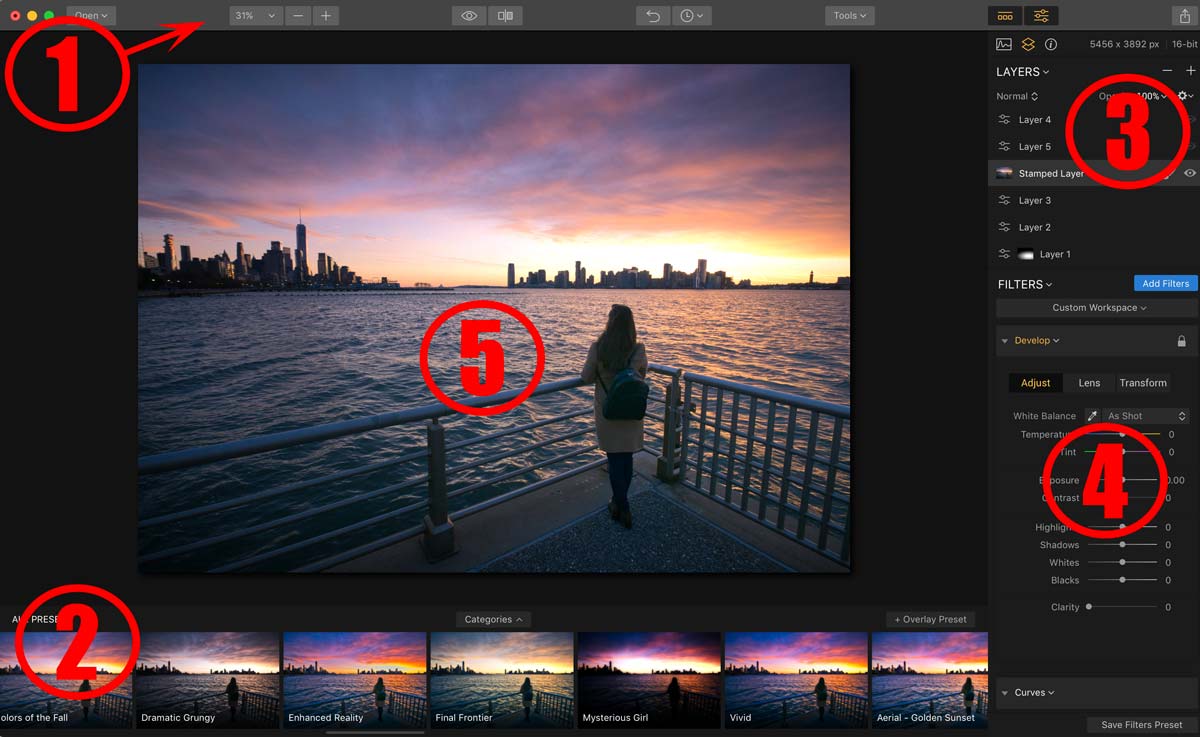
There are 5 sections that are of great interest when using Luminar and you can see them in the above image. Here is a quick summary of each of these sections.
- The top bar lets you do simple things such as (from left to right) open a file, zoom into the photo you are looking at, look at the before/after of the image you are editing, go back in time using a full history, use tools (cropping, free transform, clone stamp, erase), and enable or disable other sections of the interface. On the very right, you can also share your work right away to pages such as 500px, Smugmug, Flickr, Facebook, and so on.
- At the bottom of the screen are presets that you can (but do not have to!) use. When you get Luminar 2018, it comes with a ton of presets so you do not have to buy them extra – though you do have the chance to get more from specific photographers if you want, some free and some paid. I will talk about the presets more later.
- In this region, you will find your layers. This is one of the strengths of Luminar, as having the ability to use layers just like in Photoshop opens up way more options when it comes to your editing. Having said that, the layers in Luminar are a little special, but more to that later.
- Here you can find the adjustments that you have on a specific layer, such as Hue/Saturation, Curves, Colour Balance, and many many others. You can think of it as your workspace.
- This is your image 🙂 When you make a change in region 4, the change will be visible in region 5. Easy, right?
This is as much as you have to know about the interface of Luminar 2018. Let’s dive a little deeper and talk about the presets, the adjustment options, pricing and all.
Luminars Adjustments And Filters
When I started to dig into the options that Luminar offers when it comes to editing, I read that some people were a little reluctant as the creators of the software use the term “Filter” for any adjustment that is possible. However, that might be misleading – using a filter usually means that with the push of a button the look of an image is being changed straight away, in which case you are mostly only in control of how strong the filter is being applied to the image. However, you will not be able to control the single settings that lead to this specific look. Just like in Instagram, where you literally just click through the filters until you found a look you like, and then adjust the image using the next set of settings such as contrast and brightness and all.
In Luminar, you have what is defined as over 40 filters (49 as of the time of this post, to be exact). Many people think that this means you essentially have 40 looks that are being applied to the image and that’s it! Well, let me help you out here – this is not the case.
Much of what is called a filter in Luminar 2018 is indeed a proper adjustment. Here are some examples of adjustments that are available to you: Channel Mixer, Colour Balance, Dodge and Burn, Curves, Exposure, HSL, Highlight and Shadow control and many more. While these are of course basic adjustments, you have other things available that would not necessarily fall under the usual filter category, such as Noise Removal, Clarity, Black and White Conversion, Dehaze, Sharpening, and many others. And then, of course, you have proper filters, such as Sun Rays, Matte Look, Golden Hour, Orton Effect, Split Toning, and more.
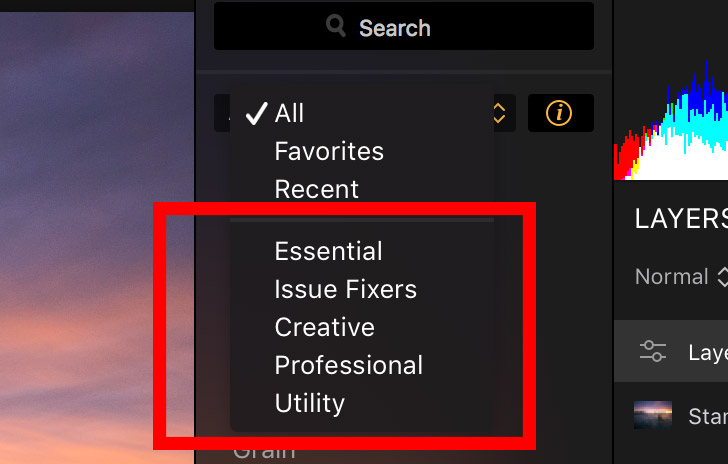
When you hit the “Add Filter” button to add one of the nearly 50 options that are there, you will find them in list format neatly arranged by these categories:
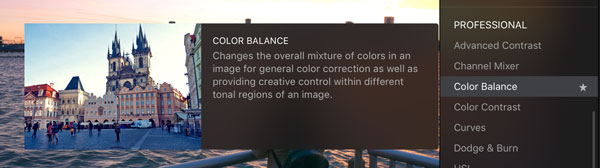
And a thing that I like very much is that hovering over any adjustment or filter will give you a short description of what the option does. This makes it perfect for beginners to understand the software – and once you know what is what, you just disable these mini tutorials.
Another cool thing is the option to use a pre-prepared workspace – this means instead of searching for the adjustments and filters yourself, you select a category and Luminar will automatically populate the workspace with adjustments for you:
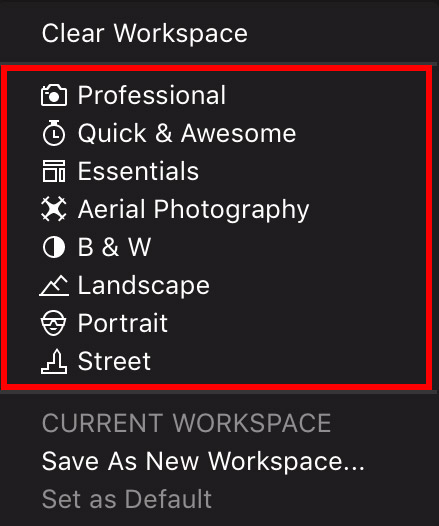
For example, selecting the “Professional” workspace will give you the develop module (where you control highlights and shadows and things like this), denoise, saturation/vibrance, accent AI filter, dehaze, remove colour cast, advanced contrast, curves, polarizing filter, HSL, split toning, structure, LUT, vignette, and dodge and burn. You can then jump right in and use the adjustments without having to gather them yourself from the menu. Of course, you can add or remove them to your liking, too.
The Layer System Of Luminar 2018
I was relatively surprised to find layers at all! For those of you that are just starting out and do not know much about layers, imagine that layers allow you to edit on different levels. For example, you can have a layer that has brightness adjustments and you have another layer that has contrast adjustments. Each layer can then be made selectively visible in the image, so that for example the brightness adjustment only affects the sky, while the contrast adjustment only affects the foreground.
In Luminar, they use an interesting principle for layers – for example, if you add an adjustment layer, then within this one layer you can have multiple adjustments. Let’s say you create such a layer and add exposure adjustments and colour adjustments, then you can either control the visibility of the layer itself, AND/OR you control the visibility of every single adjustment within the layer.
I think the best way to see layers in Luminar is to think of them in terms of folders or groups – within each group you have many adjustments. You decide the overall visibility of the group or each item within the group. This will make things a little clearer:
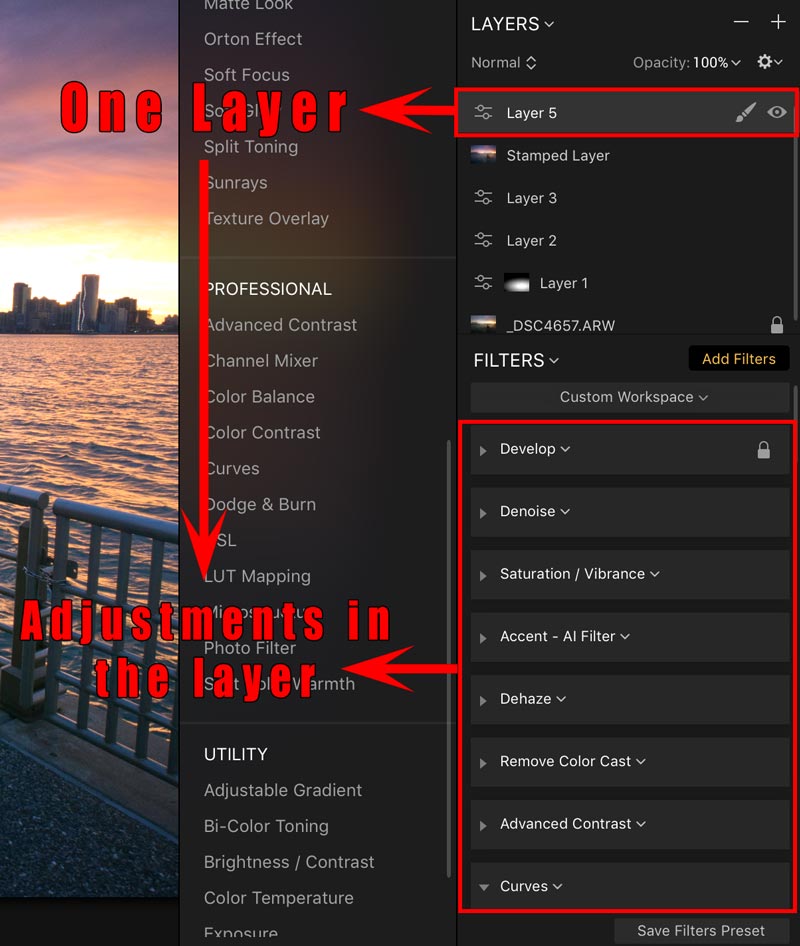
I really like this principle and found it very useful when testing. This way, you can essentially group your adjustments and filters. You could create one adjustment layer for the sky with all adjustments that the sky needs, and another for the foreground, again with all adjustments. Neat!
One last thing which I will mention later once more – if you are familiar with Photoshop at all, you might know that layers there have a blend mode. Did you know that Luminar has the same? Yes! Each layer and even each adjustment within a layer has its own blend mode, just the same ones that you find in Photoshop! I find this quite amazing – for my own processing blend modes are crucial, so I am happy to see them here.
Luminar 2018 And Presets
I mentioned before that you have the choice of a large amount of presets. But what do they do? Simple – if you click on a preset preview (see below), Luminar will load in all adjustments and filters needed to create the look into your workspace and then adjust them accordingly. Why is this important? Because now you can go in and adjust them to your liking!

Picking a preset is often frowned upon as it takes a little creativity out of the editing and there is, of course, no “one look fits all” setting. I see presets a little differently – I look at the mini preview and find something that I kind of like. Just kind of. I use this preset to have an idea as to where I want to go with the image and explore different looks in a fast manner. Once I have the preset, I then go in and change the settings or throw the image into Photoshop if needed. So, a preset can help to get you a little further on the way but is rarely able to finish a photo. The decision to use them is up to you, but if you are someone that likes presets, then you will not be disappointed with the ones that come with Luminar. You can even get more free presets on the Luminar homepage if you feel like!
You can even use a combination of presets if this is what you like. For this, you just create a layer, apply a preset, create a new layer, and apply another preset. Play around, it is great fun!
Examples of Luminar 2018
Here are some examples that I edited with Luminar so that you can get an idea as to what you can do with it 🙂 Note that I have created these images for testing purposes so they are not fully done, but I do like the transformation!
[bais_before_after before_image=”https://letsimage.com/wp-content/uploads/2018/01/luminar-example-1-original.jpg” after_image=”https://letsimage.com/wp-content/uploads/2018/01/luminar-example-1-final.jpg”]
[bais_before_after before_image=”https://letsimage.com/wp-content/uploads/2018/01/luminar-example-2-original.jpg” after_image=”https://letsimage.com/wp-content/uploads/2018/01/luminar-example-2-final.jpg”]
[bais_before_after before_image=”https://letsimage.com/wp-content/uploads/2018/01/luminar-example-3-original.jpg” after_image=”https://letsimage.com/wp-content/uploads/2018/01/luminar-example-3-final.jpg”]
[bais_before_after before_image=”https://letsimage.com/wp-content/uploads/2018/01/luminar-example-4-original.jpg” after_image=”https://letsimage.com/wp-content/uploads/2018/01/luminar-example-4-final.jpg”]
Beginner or Pro – Who Can Use Luminar 2018?
If you are a beginner, then Luminar is definitely worth to be checked out. Due to its simple interface, the option to use a variety of presets, and an explanation for every adjustment available, the software will make it easy for you to jump right in.
Furthermore, remember how I talked about the layer system in Luminar before? If you ever plan on using other software such as Photoshop, layers are essential but often a great part of the initial confusion. Here, the layer system is intuitive and even a little more powerful (with limitations, read below) – a great place to understand how to work with layers.
Now, for the professionals – indeed, I believe that Luminar has most of the options that one could need for editing images. From lens correction, chromatic aberration tools, and several transformation options over dozens of basic adjustments to finishers such as noise removal and sharpening. You will also find things that usually take a little longer when doing them manually in Photoshop for example, such as an Orton effect or a soft glow. Of course, it depends a little on what you usually photograph to now if Luminar works for you – but I talk about this later as well.
The Price of Luminar 2018
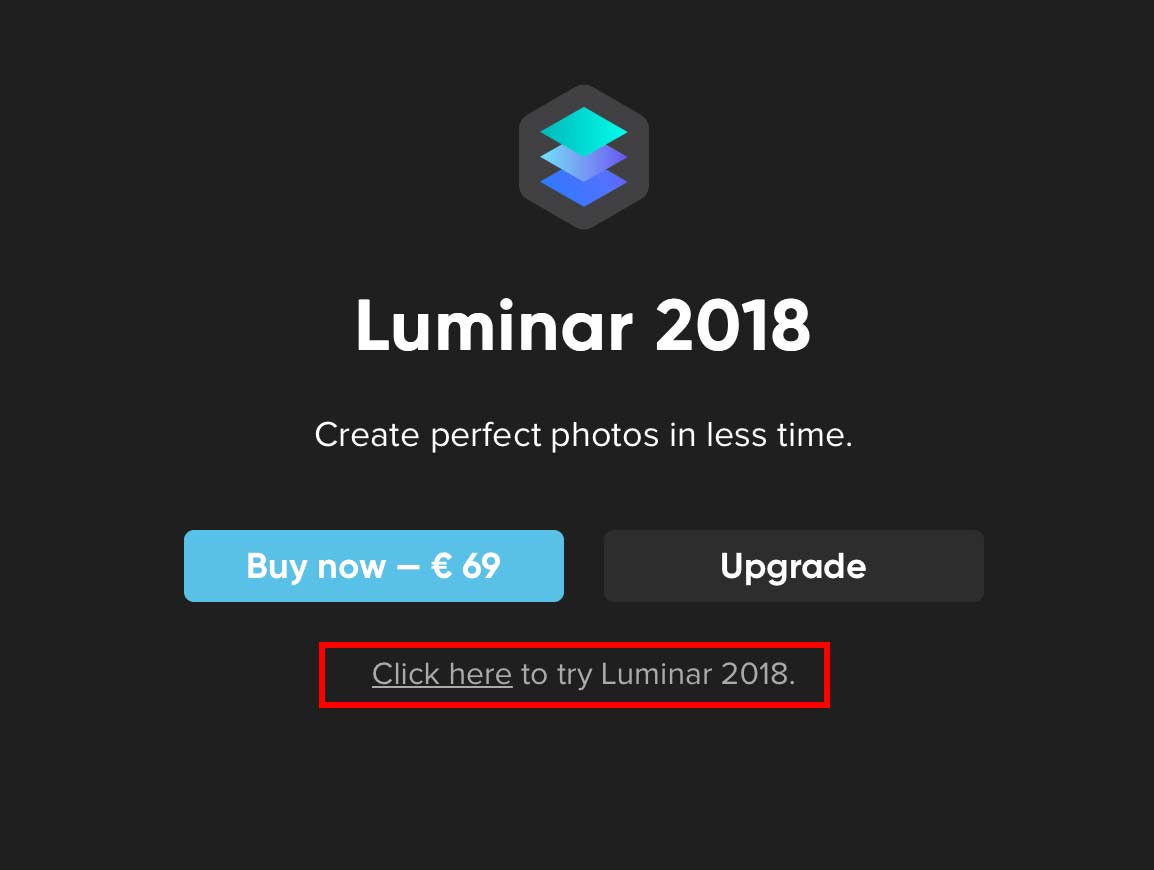
As of the time of this article, Luminar can be bought for a one-time payment of 69 Euro/Dollar. No subscription or anything, you buy it and it is yours. Having said that, it seems that when the next version comes out (Luminar 2019), you might have to upgrade to the 2019 version for a price. There is a great discount when you upgrade to the new version, but as I have not upgraded yet I can not tell you how much that would be. If you have upgraded and you know, let me know! 🙂 UPDATE: It is 49 Euro to upgrade.
By the way, did you know you can try Luminar 2018 for two weeks for free? Check the webpage here and scroll down until you see the below – and then test it yourself 🙂
If you like it, get it here and save 10 Euro/Dollar by using the promo code “LETSIMAGE” at checkout!
Remarkable Things in Luminar 2018
Here are some things that stood out for me personally when testing this software – maybe this will help you to decide whether it is something for you 🙂
Layers and Masks
Luminar has a great and well-advanced layering system with the proper masking that is known from Photoshop. But not just that – each layer can have a mask, but each adjustment within a layer can have one too! You have use of the common tools such as the brush, radial and linear gradient masks and can go ham! The brush is fully compatible with tablets and pens, which is great if you are used to working with such gear. Furthermore, each layer and each adjustment within a layer has its own blend mode – which I find remarkable. This is a super important point when looking at all about the all new Luminar 2018.
History
While I am used to it from Photoshop, I did not expect this here – Luminar has a full history function. This means that at any point in time you can trace back every brush stroke that you did to fix a mistake if you have to.
Batch Processing
While this is not something that I would personally use often, it is great to have – batch processing. If you for instance shoot weddings or so where you need to make some sort of a base edit to all the images, then this is perfect to be used. In this case, you could create your own preset and apply it to as many images as needed.
Integrations
You know how some people have 243 different programmes to edit on the computer? You would start processing in one, export the image, switch to the next, edit and export, and so on until you are done. I am glad that Luminar is very well integrated with other software – You can use Luminar stand-alone, or integrate it into Photoshop, Lightroom, Photoshop Elements, or Apples Aperture. Luminar essentially becomes a plug-in within these programmes.
I also like the fact that you can a) use Aurora HDR (an HDR software that is purely awesome, check it out here) from within Luminar and b) export straight into Photoshop! One click and Photoshop opens with the image. Now, this of course is not important for everyone, but for me this is perfect.
Adjustments and Filters
Here are some of the adjustments and filters that I liked especially – once more, just to give you an idea as to what is possible 🙂
Clarity/Dehaze/Denoise
These might sound simple, but the ability to add clarity to an image plus dehaze and denoise it usually requires more clicks for me when I use other programmes. In Luminar, these three functions work great and are accessible with 1 click.
Orton Effect
To create an Orton effect (an effect that makes the image softer), I usually have to create a stamp visible in Photoshop, change the blend mode, blur the layer a certain amount … So there are a couple of steps involved. With the filter, this takes one click and a slider to decide how much of an Orton effect I want.
Golden Hour
Simple yet neat – this is a simple slider that adds a more golden colour to the image – so if you have an image that has been taken within the golden hour, this is a perfect little slider to add some more of that golden aura to the photo.
Matte Look
This is a well-known effect from Instagram and I rarely use it as I mostly shoot landscapes and cityscapes, but it is cool to have it here for creativity! Again, to create the effect in Photoshop takes a moment, here it is one click and great options to customize the matte look. I am not sure how often I will use this for my own work, but I simply like the function itself, hehe.
LUT Mapping
LUTs, or look-up tables, are more known from the video industry. You use a LUT to apply a certain look (contrast and colour) to an image and I have not seen many programmes that incorporate this into their functions. If you have a LUT from your favourite artist or so, you can simply apply it to your images to get a similar style.
Texture Overlays
Using a texture to place it on an image to make it look crunchy is something I do every now and again, so I was happy to find the option within Luminar 2018. You click the button, add the texture and load it in. Simple, fast.
Customizability
A very important part my ‘All About The All New Luminar 2018’ article: for people that process a lot – you need your workspace to be tailored to you. And this is exactly what you can do – you pick the adjustments and filters that you need from the fast amount that is available and place them in your workspace. You then save the workspace and use it the next time you need it. This way, you can have as many workspaces as you like. Similarly, once you have found a look that you would like to apply to other images, simply save your settings as a preset. Done.
Things to Improve
While I have said a lot of positive things about Luminar as part , there are also some areas where I can see space for improvement. I mean, it is just fair to point them out to you 🙂
Speed
When you do basic editing with relatively low number of layers and adjustments everything is fine. Even if you have 4 layers and 3 adjustments within each, things are fine. However, if you are like me and you have 35 layers with 10 adjustments in each – each with different masks – and you like to jump back and forth between them, then things start to stutter a little. This is normal, as the software seems to recalculate all the adjustments that were made when zooming and jumping between layers. Having said that, my hardware is not the best anymore and it might simply be a matter of getting better hardware, but I thought I mention it 🙂
This is literally the only thing that I could find that is worth improving! Coming from a Photoshop background, I am used to zooming a lot and fixing tiny things – and as Luminar recalculates all settings everytime I move through the image or zoom, there is a good waiting time involved.
Organization of Photos
The only thing that I could imagine it to be added from the functionality side of things is the ability to organize your photos, much like in Lightroom. But you know what? Skylum (the makers of Luminar) have already announced that this will be coming this year! Stay tuned, hehe.
Conclusion
For the price of drinking for two nights in Dublin, Ireland, you get unlimited access to a full-fletched editing software (beer is expensive here). Luminar comes with tons of features that you would otherwise only find in old-school professional editing software such as Photoshop, which is remarkable. Luminar is in no way a “throw a filter on the image” kind of software, it allows for proper editing while having filters ready for you to use. Due to proper explanations and great supportive material, it is easy to jump right in and get going with your own editing. I do recommend this programme to beginners and professionals alike – but of course, recommend to make use of the two weeks free access to see what you think. In the end, you have to make your own conclusion and decision 🙂 This is especially the case for people that use advanced techniques such as frequency separation and alike, which will not be easily possible with Luminar.
I hope you enjoyed this article about all about the all new Luminar 2018! Let me know what you create in the comments below.


Hi, Wonderful Post.. I really Like your post..This is a awesome tips.. Thanks for sharing the good information.
Thank you very much for the kind words! And thank you for stopping by 🙂