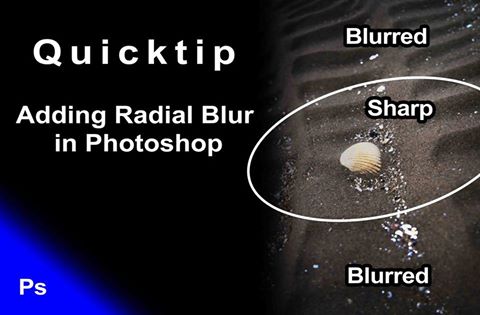
Today I am going to give you a super quick tip on how to add some atmosphere to your images using the radial blur function in Photoshop. If you are a beginner in Photoshop, then this is for you 🙂 If you like the video above, don’t forget to subscribe to the channel here!
The steps are easy – Start off by creating a stamp visible layer by hitting CMD+alt+shift+e on your keyboard (1:00 min in the video). Doing so will basically copy all that is visible right now onto a new layer. This layer will then show up in the layer section of your Photoshop window (bottom right).
Then, to add the blur, go to Filter-Filter Gallery-Iris Blur (1:23 min). Once you reached that point, that is nearly all there is to do! Change the size of your blur radius, maybe add some effect (2:45 min), done.
I recommend to play a little bit with the other blur options in the Blur Gallery window, they are super cool and, fyi, they were not always there. Back in the days one had to do such blur with some more steps.
Remember, shortcuts can make your life easier! This time, I used
CMD+alt+shift+e
to create the stamp visible.
Like my Images? See them all at www.letsimage.smugmug.com
Don’t forget to get out there and take some pictures yourself!