https://youtu.be/v2x9ewAOrH0
How to Play with Colours in Photoshop – Example: Little Castle
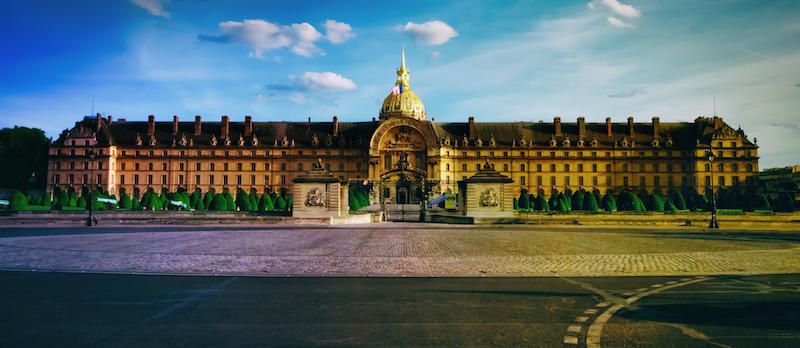
Colours. Its can be great fun to play with them for hours! Thats what I did in this image I took somewhere in Paris this year. You wouldn’t happen to know the name of the castle?
So, today I will show you how I processed the image. Here is the final version:
And here is the original version:

I did a lot of stuff in this image! I had to remove people and cars! I used two images taken at different times first and combined the empty spaces where I could. Then I sat down and used the clone stamp tool to remove the rest. That took a while, but the image was empty in the end.
Then I did this (in a nutshell):
- I used the gradient tool to add blue and orange to the sides of the image
- I used curves and contrast adjustments to strengthen and weaken the colours in certain areas in the foreground
- Then I cleaned up the sky using curves and the camera raw filter (bye bye noise)
- And once more the curve tool to give it a final colour adjustment
Sounds simple, but in the original processing it was actually quite a lot of work. Fun work though!
When working with colours in Photoshop, it is important to take your time! I made some adjustments and went away for some minutes. When I came back, I had a fresh eye and could say if the adjustments were good or not. Same principle as being in low light, your eyes will get used to colours. So do it, take a break and come back!
PS: If you like my images, make sure to have a look at my portfolio for more examples of lots of HDR Photography (thats what I am doing normally – here I was in the middle of the street and didn’t have time to take several shots hehe).