Welcome back, it is time to edit more photos in Photoshop! Here is another start-to-finish editing tutorial using the flag ship of all editing software. If you know what layers are, how layer masks work, and have heard of adjustment layers, then you are good to go! If you are not and you are getting started in Photoshop right now, I suggest having a read through this article – all you need to know to jump into this awesome software. So, let’s go!
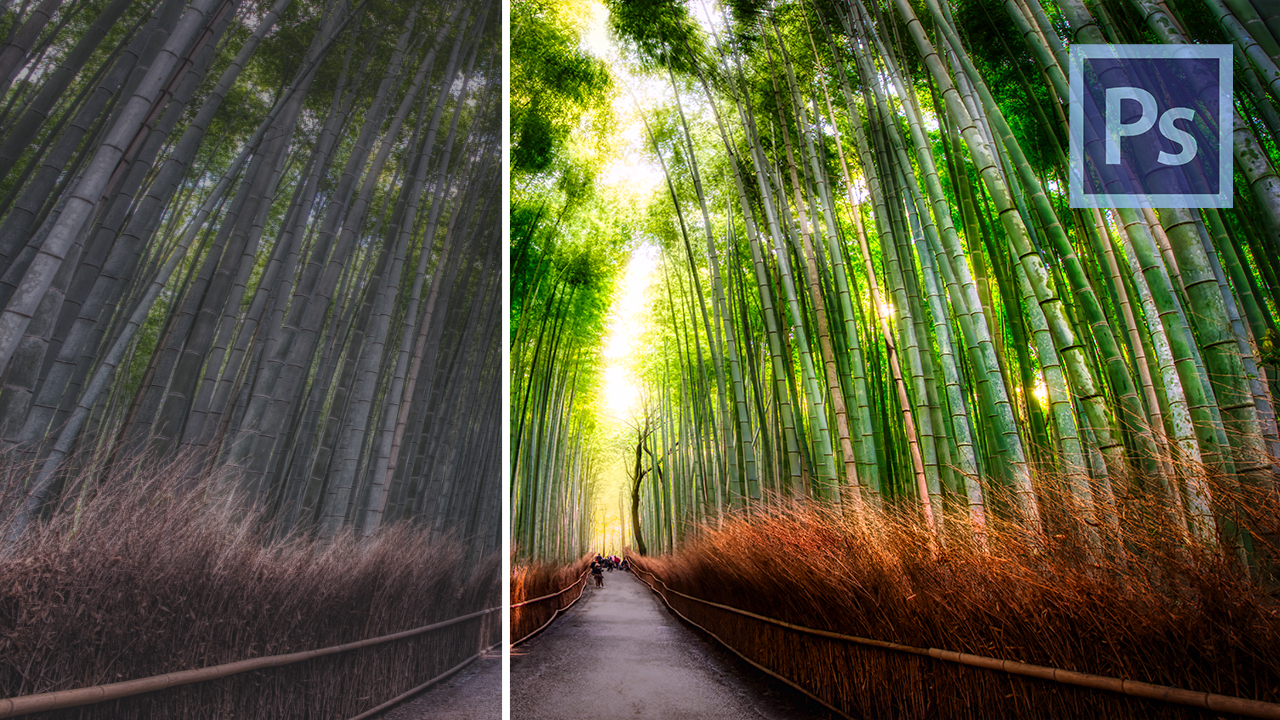
Here is the before and after of the image:
[bais_before_after before_image=”https://letsimage.com/wp-content/uploads/2019/05/kyoto-bamboo-forest-original-small.jpg” after_image=”https://letsimage.com/wp-content/uploads/2019/05/kyoto-bamboo-forest-final-small.jpg”]Oh, and I should probably tell you where this is, eh? This image has been taken very close to Kyoto, Japan, earlier this year.
This is one of the most famous bamboo forests in Japan! Arashiyama Bamboo Grove looks absolutely stunning when you walk through or whenever you see it in pictures – however, there is one thing that comes with the fame: tourists. Like me, hundreds of people everyday make their way to the forest to take selfies and whatnot and it is a real challenge to get a picture of the place without anyone. A challenge that I failed, I might add, as you can see some people in the very centre.
I visited the forest twice – the first time was around lunch time and there was no chance to take any great photo. Ok, so the next morning I woke up earlier and arrived at 7 AM – just to find 20 people just like me that already took camp at this very well photographed spot. This is as close as I ever came to having this place empty.
So, here is a short summary of what I did during the editing – you can see the full process in in the video above!
- Transform the Image – To make sure the path and the light-line in the canopy are in the centre of the image, the first step was to transform it. This was easy using the transform tool in Photoshop! Get used to it, you will do this all the time when you edit photos in Photoshop.
- Boost the Colours – When you think of a bamboo forest, you think of this super dense, green, perfectly symmetrical canopy, right? I know I do! Well, in the photo, the colours weren’t really there, which is something that needs fixing! I added a new layer with the blend mode ‘Colour’ and then simply painted some green over the bamboo! This is actually one of my favourite parts when editing, the application of colour. Go wild! Here is another example.
- Adapt the Lighting – To make sure the eye of the beholder is drawn towards the centre of the image, we have to play with the light a little bit. Simple – first, I added a vignette, then I boosted the highlights using the Camera Raw Filter. I love vignettes! Here is a full tutorial on many ways of creating them.
- Create Warm Highlights – To break the canopy up a little and create some dynamics, I wanted to create some hot spots in the image. An easy way of doing this is by creating a colour balance layer and pulling the sliders towards yellow and red. This could then be penciled in using a nice soft brush – especially in the highlights!
On a side note that is not related to editing at all – if you have not been to Japan yet but you have even the most remote interest, You. Must. Go! I spend some weeks there and it has been an incredible experience. The amount of photo opportunities in relation to the size of the country are insane! There will be many many!! more images over the next months, so make sure to come back and check them out!