How to Create a Post Apocalyptic Scene in Photoshop – Example: The Failed Rebuild
Welcome back! While I was touring through the south of Ireland, I came across a little village close to the motorway. A friend and I stopped for a coffee, which was when we found this little demolished building on a riverside. The scene was very beautiful and I decided on creating a somewhat post-apocalyptic scene later in Photoshop. And this is exactly what happened hehe, so let me show you how to Create a Post Apocalyptic Scene in Photoshop.
If you like the video, make sure to subscribe for more weekly Photoshop and Photography action!
So here is the final image:
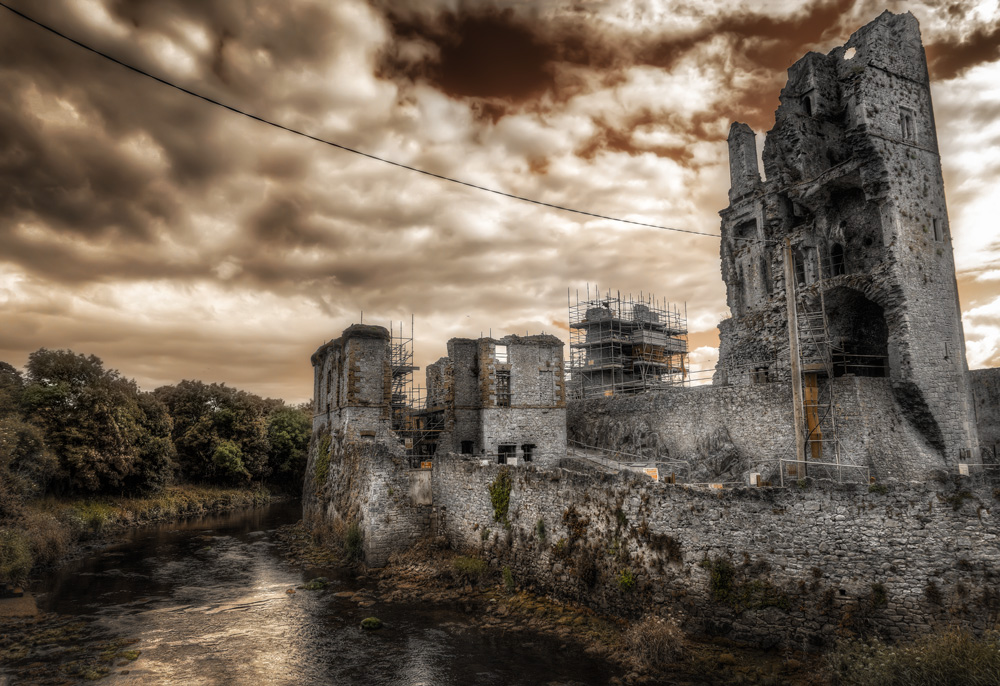
And here is the original (HDR version out of Photomatix):
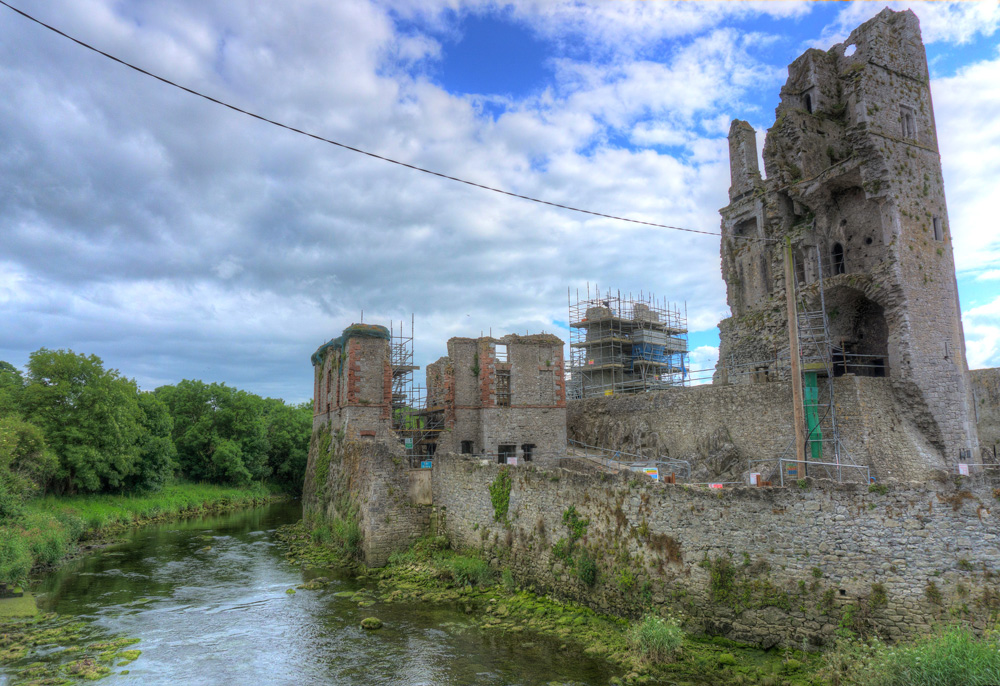
The Photoshop processing was actually quite straight forward! The ‘original image’ was an HDR (high dynamic range) picture, which means it is a mix of three images taken at different exposures. If this sounds new to you, have a look at this to get an idea of what HDR photos are.
Part One – Change The Colour As A Whole (0:20 min)
The original image came out quite saturated after using Photomatix – but this was fine as I intended to give it a somewhat monochrome look anyway. For this, I created a new layer (CMD+Alt+Shift+N on the keyboard) and selected the Paint Bucket Tool from the Tool Pallet on the left site. Using a nice brown colour, I then filled the new layer with the new colour. Great, now nothing other than the colour was visible – so with the new layer selected, I went to the Blending Mode (just above the layer thumbnails) and changed the Mode to Hue. All hue within the original image was replaced with the new (brown) hue. That’s 80% of the colour I wanted right there.
Part Two – Dodging And Burning (1:00 min)
There are many ways to dodge and burn – if you have never heard of this, it describes the process of darkening and brightening some areas in the image. I did it by creating a new layer (CMD+Alt+Shift+N) and change its blending mode to Overlay just like described above. Then I hit B on the keyboard to get my Brush, after which I used Black and White to lighten (White) or darken (Black) certain areas in the image.
Part Three – Add Crispness To The Image And Darken The Sky (3:50 min)
Is crispness a word? Anyway, I created a stamp visible, which copies everything visible onto a new layer (CMD+Alt+Shift+E on the keyboard). Then I went to Filter-Camera Raw Filter and increased the Clarity by using the slider at the bottom of the window.
To give a little bit more definition to the sky, I just created a quick Curve Adjustment Layer and pulled this one down until it felt right. After inverting the layer mask (CMD+I), the brush (B) brought the effect into the sky. I finished the sky (for now) with a little desaturation using a Hue/Saturation Adjustment Layer and brushing through just like above. By the way, if you are just starting out and haven’t heard about layer masks yet, watch this first.
Part Four – Tonal Contrast (6:00 min)
The image was still a little flat. And when it comes to how to create a post-apocalyptic scene in Photoshop, this can not be. A way to change this is by the use of one of the Filters made by the Google Nik Collection. It is a free filter set, so if you haven’t already, go ahead and download it here. ITS FREE! So, I created a stamp visible (CMD+Alt+Shift+E on the keyboard) and went to Filter-Nik Collection-Colour Effex-Tonal Contrast. There was no need to adjust anything further, I normally like it the way it is. By hitting the little Japanese flag symbol beneath the layer thumbnails, I then created a layer mask and used a brush (B) to bring the effect wherever I liked it.
Part Five – Reduce The Brightness And Remove Noise (8:45 min)
I believe it is important for every image that the light makes the viewer focus on a certain part within the image. In this case, there was a general brightness everywhere which I didn’t like too much. So, I created a Curve Adjustment Layer and reduced the Brightness, after which a Layer Mask was used to localise the effect on the lower edges of the image.
Due to the stuff we did (Tonal Contrast etc.), noise has build up in the clouds. Instead of just removing the noise, I used the chance to make the clouds very smooth. Creating a stamp visible (CMD+Alt+Shift+E), I went to Filter-Camera Raw Filter-Detail. There I dragged the noise slider all the way to the right and the Luminance Detail all the way to the left. Ok. Now we have lost detail all over the place, which isn’t that great. Using a Layer Mask, I brought the effect into the clouds.
Part Six – Add Another Colour (11:45 min)
While the whole image has some sort of brown, I wanted to have another ‘dead’ colour in there – maybe a mixture of green/yellow/brown-ish. I mean, in the end, this is all about how to create a post-apocalyptic scene in Photoshop! Therefore, I created a new layer (CMD+Alt+Shift+N on the keyboard) and used the Paint Bucket Tool to fill this new layer with a random colour. Blue in this instance. Using a Layer Mask, I started to add this colour to some of the bushes and plants on the wall of the ruin. Now, I didn’t want blue of course, so I adapted the colour by creating a Hue/Saturation Layer and clipping it to the ‘blue’ layer (CMD+Alt+G). Now the adjustment will only affect the blue layer. I then dragged the Hue slider around until I had a colour which felt right.
Part Seven – Add A Vignette (19:00 min)
Let’s darken the edges of the image a little bit further. That’s fast: Stamp visible (CMD+Alt+Shift+E on the keyboard), Filter-Camera Raw Filter-fx-Vignette. Done! This was all there was to do to create this post-apocalyptic scene in Photoshop.
Remember, shortcuts make your life easier and can speed up your processing a lot! Here is what I used in this image:
CMD+Alt+Shift+E to create a stamp visible
B for the brush
J for the Spot Healing Brush Tool
CMD+Alt+Shift+N to create a new empty layer
CMD+I to invert anything
CMD+J to duplicate a layer or a selection
CMD+Alt+G to clip a layer or adjustment
G for the Paint Bucket Tool
C to Crop
CMD+T to free transform
If you like my images, make sure to check out my portfolio! I hope you liked the article and learned a little more about how to create a post-apocalyptic scene in Photoshop.
Don’t forget to get out there and take some pictures yourself!

We wish to thank you once again for the lovely ideas you gave Jeremy when preparing her own post-graduate research as well as,
most importantly, for providing each of the ideas in a blog post.
Provided that we had been aware of your web page a year ago, we might have
been rescued from the pointless measures we were choosing.
Thanks to you.
You have remarked very interesting details! ps decent web site.
I really appreciate this post. I have been looking all over
for this! Thank goodness I found it on Bing. You have made
my day! Thanks again!
I enjoy the efforts you have put in this, thanks for all the great posts.
Thanks a ton Jeannine! It is great so see people enjoying my content 🙂 Let me know if there is anything in particular that you would like to see on the blog/channel. Greetings!
This is my first time I visit here. I found so many enitntainerg stuff in your blog, principally its dialogue. great amount of on your articles, I reckon I am not the only one having an interest.on a regular basis to read.