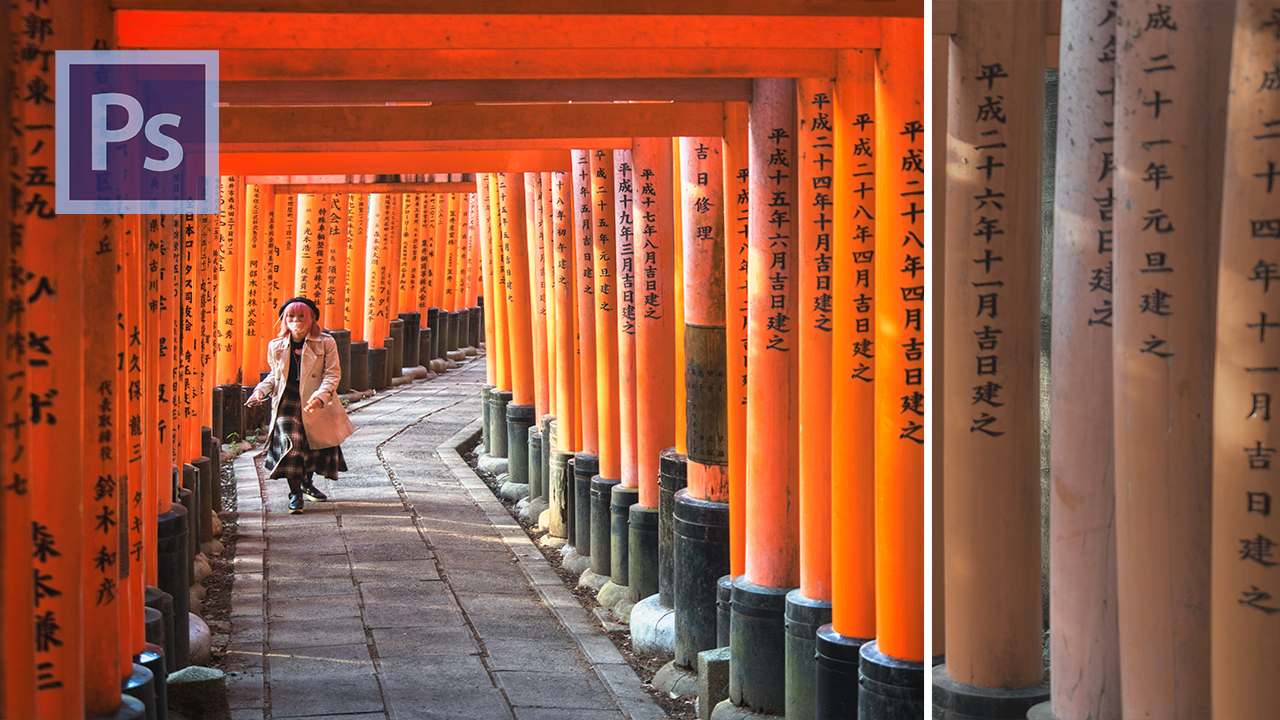
Welcome back! it is time for some more hot photo editing action, this time in Photoshop, and to learn how to make your images look amazing. The image we will use is from Kyoto in Japan and shows one of my most favourite places there – the Fushimi Inari Shrine. In essence, you have an about 30 min walk through gates such as the ones in the photo and if you look carefully, you find angles from which there is nothing else to see but tunnels. Going to Japan? Make sure to stop by! You can read the full story of this image over at my portfolio.
Here is the before and after of the image:
[bais_before_after before_image=”https://letsimage.com/wp-content/uploads/2019/05/kyoto-gates-original-small.jpg” after_image=”https://letsimage.com/wp-content/uploads/2019/05/tori-gate-tunnel-final-small.jpg”]
You have the full processing in the video, so here is a summary of what I did to clean this up a little. In short, I had to close a gap between the gates, fix the symmetry slightly, and edit the colors and lighting situation a bit. Simple, but these steos will certainly help you on the way to learn how to make your images look amazing.
1 – Fix the Gap. The image was close to perfect as the tunnel was nearly completely enclosed, but there was one gap between the gates on the right hand side. I could have left it, but I would have been annoyed every time I look at the image. The fix was simple: first I selected the gates to the right of the gap using the pen tool and placed them on their own layer. I then transformed this layer and warped it a bit to close the gap.
2 – Blend the Gates. After the gap was closed, the gates that now connected looked slightly out of place. No problem, with a little bit of a curve adjustment layer I was able to adjust the brightness and the color intensity and blend the gate connection properly.
3 – Adjust Color. The gates had a very nice orange to them, but I wanted to bring them a little more into the red – it just felt right. For this, I created a Hue/Saturation layer, selected the yellow color range, and moved the slider a little to the side. This did a great job and is a super easy way of changing colors.
4 – Create Attention in the Center of the Image. Thanks to the person that was walking through the tunnels, there is a really nice spot to direct the eyes of the beholder to. However, to make this even easier for the eye, we have to help this a little using light. So, first I used the camera raw filter to add a vignette to the image, followed by a curve adjustment layer and a well-placed layer mask to brighten up the center of the image.
That was it! I hope this editing example helps some of you that are looking to create similar styles, or those that simply want to see more complete editing examples as they start out in Photoshop. It doesnt have to be complicated, simple adjustments can help in learning how to make your images look amazing.
BTW, if you liked this editing example and you want to see more, check out all my editing tutorials here – enjoy!