When I tell people what kind of images I like to take the most, I very often say “HDR I think”. Mostly I get a confused head shake followed by “Is that landscape photography?”. There are many beginners out there getting started with a new camera (or an old one for that matter) and eager to jump right into it – some not even aware of this incredible “tool” they have at their disposal. I dealt quite a bit with HDR and think a nice and simple introduction would be beneficial for many starters, interested or uncertain people or even experienced picture hunters who would like to try something new. For that, I will explain What is HDR, Why would one like to do HDR images and How to take HDR Images (with any DSLR or compact cam).
What is HDR?
HDR is short for High Dynamic Range. What that means is, its all about light.
Have you ever found yourself standing in front of a stunning scenery – say a sunset over a waterfall or something like this – and you just got a little tear falling down your cheek? Maybe it was even a little bit cloudy and those clouds were lit by the sun beneath them, adding some amazing drama to the whole thing. When you look at such a scene and your eye travels all over it, you can perfectly see the shape of the clouds, the amazing colours they have – then you go a bit more down and you maybe see a mountain or a hill very colourful shining somewhere in the back. Further down, you might see this amazing crystal clear water falling and flowing into a neat lake just in front of you – you see it all. It doesn’t matter where you move your eyes to, you will see all the colours, all the contrast, all the shapes, all the reflections, just everything. Why is that?
Your eye is incredible fast in adapting to light situations. It takes less than half a second to change from a less bright to a very bright situation (if not too extreme hehe) and every time you move your eyes they will adapt slightly to let you see the best contrast under certain light conditions. In the eye you have different mechanisms doing that, a somewhat build in aperture if you want, changing all the time in super speed. With a camera, it doesn’t work like that. If you point a camera at our imaginary clouds, then the rest of the image (the amazing waterfall etc) will be dark to an extend where you barely can see it at all! The other way around, point the camera at the waterfall and you might get a white-ish blown out sky, loosing all the amazing clouds which just made you cry. So in nature, there is a very high dynamic range of light and HDR photography aims to get all this nice dynamic light and safe it in an image, so that you can see the clouds, the water fall AND the lake in equal amazing quality.
Why would one like to do HDR images?
That would depend on what you like to take pictures of – Some people love to take macro (very close to the object) images of insects. I am not a hundred percent sure that these images would benefit much from HDR as the main object should be the one in focus, perfectly lit and so on. Ok – how about nature, landscape, architectural photography, you name it?
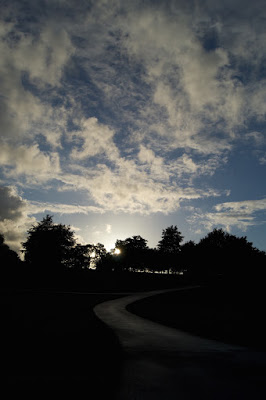
Personally, I believe HDR can be a great contribution to those kind of images. If you have read the What is HDR part, then you know that it aims at making everything as visible in an image as it is for the naked eye in nature. Think about that. Or not, just have a look at these images now. The first one is a normal image, taken with a DSLR in auto mode (could be any camera). See how you don’t see much:
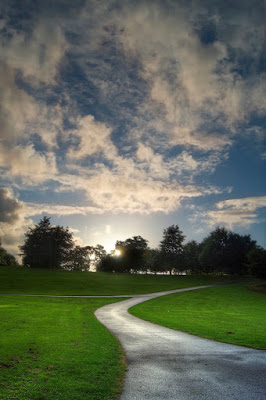
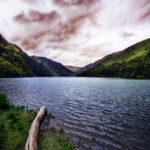
Now, the image below is the same scene taken in HDR style (I will talk about the How to take HDR images later).
Do you see the difference? In the latter, you can see all levels of light in the different areas of the image – you see the clouds, the trees and the path going towards the tree line in the back. And from this, imagine what you can do – you can put the emphasis on whatever you want! You can change whatever part of the image in any way possible! You can interpret the very same image in a hundred ways just by working on different parts of it. Want the sky a little brighter and the ground with more black? Go. Or how about darken the sky drastically while increasing the contrast to add extreme drama? Do it then. Black and white? Well, if you like – you have all the detail and all the light which was there initially to work with. No blown out areas. No dark portraits. All the detail. All the colour. All the contrast. All the scene.
How to take HDR images?
As this is intended to be introductory, I will show you the things every decent camera can do, not the special modes (called auto-bracketing) some higher cams have or the one-shot HDRs.
First things first – I said earlier that pointing a camera towards a very dynamic scene will end up in a blown out sky or a dark ground. So how can one change that?
The answer is … not yet – lets talk quickly about which mode to shoot in.
Why is that important? Well, for HDR images you will have to take multiple images at different light levels. There are three things to consider when doing that: ISO, Shutter speed and Aperture. ISO is (in short) the sensitivity of your camera sensor, Shutter speed determines how long will the camera take in the light through the lens and Aperture is responsible for how much of the image should be in focus (and what should be blurry, key word: depth of field) in an image (nutshell style, I like it).
I mentioned multiple images at different light levels – when you take more than one shot from the same scene, you don’t want to change the focus. You want the tree which is sharp in the first image to be sharp as well in the second image because you are going to combine these two (or more) images into one ultimately. So focus and depth of field are important and because Aperture is the boss of depth of field, I would strongly recommend to shoot in the so called Aperture priority mode (most likely it looks like the image below on your cam or similar).
 |
| Wikipedia Images rule |
Using this mode, your camera lets you change the so called f-stop, a number ranging from (depending a little on the lens) maybe 3 to 22 or so. When I take HDR images (or better, when I take images which I will use to create an HDR image later), I like to have as much as possible in focus so that I can decide later what I want to have blurred and what not. To have as much as possible in focus so that most of the picture will look sharp, just choose an Aperture of 9. Some people call it the golden number and it’ll do just nicely for most scenarios.
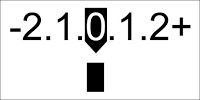
Nearly ready to go – there is just one function you’re gonna have to find on your camera: exposure compensation! It will look more or less like this:
 |
| http://sportsphotographysuccess.com/tag/exposure-compensation/ |
This scale can extent to -5 and +5, depending on the cam you use. So here is – user-friendly – how it works.
- Use a tripod or a bag or something to keep the cam stable.
- Switch the cam to Aperture priority mode and select an f-stop of 9.
- Bright day? Change your ISO to 100 (or 200 if thats what your cam has), dark day go to 800.
- Focus on whatever you like – I recommend manual focus to make sure it stays where it is.
- Check your exposure compensation and make sure it is at 0.
- Use the timer (2 sec) to make sure the cam is unmoved while the shutter goes off.
- Take the first image.
- Now try not to move the camera while you go to your exposure compensation and set it to -2. Take a shot.
- And the same again for an exposure compensation of +2. Thats it for that part, well done!
The next one I will just touch – I am going to give you detailed information on how to process these images later as it would go a little far here. So for starters, you are going to need software: either just photoshop or something called photomatix. If you have Photomatix, drag and drop your images in there and you’ll see what you have to do. In Photoshop its a little more complicated: you should be familiar with layers, layer masks and filters. In a nutshell, you have to import the three images (0 exposure, +2 and -2) as layers into photoshop and use the HDR function of Photoshop to create an HDR. The three initial images and the HDR image will be 4 layers. If you imagine that these different versions of the image are stacked on top of each other, you can use a so called layer mask to erase parts of the image on top of that stack to make the one underneath visible! Once you have combined the top two images in any way you like, you go to the one beneath and so on.
I will elaborate this last part in another tutorial, so stay tuned!
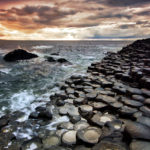
Wanna see some examples of HDR photography? Have a look at my portfolio!




12 Replies to “An introduction to HDR Photography”
Comments are closed.