How to Change Color in Photoshop – Tied To No End | Photoshop Tutorials
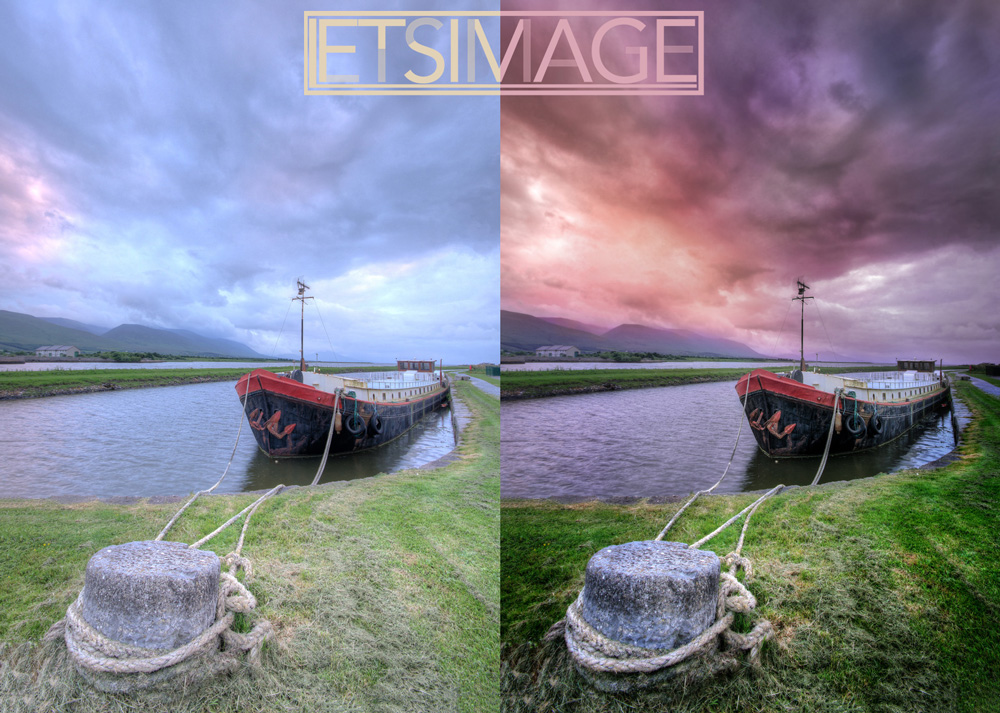
Welcome back to another one of my Photoshop tutorials. Today, it is all about changing the paint in Photoshop! I found it quite pleasing to bring some mad colors into a sky and make it look like a magical and not necessarily real scene. This picture of a tied up boat in the south of Ireland was just perfect for this. This is an HDR image – if you haven’t heard about this up until now, read this to get started! Remember, if you like the video, make sure to subscribe for more weekly Photoshop and Photography action!
If you are in a hurry, there is a way shorter 5 min tutorial on this here.
Here is the original (left) and the final (right) image:

Part One – Create The Color In The Sky (0:30 min)
This is one of those images where I didn’t have to do too much at all! It still took a while, but that is just because I have been going away to re-check the color changes later. So let’s get started on that sky.
In the original, there was quite a lot of blue in the sky, which I didn’t necessarily like. So, to start, I created a Hue/Saturation layer which, in my case, is located just above all the layer thumbnails on the right site of the Photoshop window. Your Photoshop might be organized a little differently, so just hit the fx-button below the thumbnails and find Hue/Saturation there. Once in there, I went to the Blue Channel and dragged the Hue slider towards the right. This changed the general hue of the blues into a purple tone, which was exactly what I was looking for. To make sure the effect wasn’t visible everywhere, I hit CMD+I on the keyboard to invert the layer mask and hide the effect everywhere. After hitting B on the keyboard to get my brush, I painted with a white color in the layer mask wherever I wanted to have the color changed.
After this, I used a simple curve adjustment layer to decrease the brightness of the sky a little. Here is a cool tip: if you make an adjustment and you want this adjustment to be visible where another one is, you can just hold Alt on the keyboard and drag and drop a layer mask onto another adjustment layer. Photoshop will ask if you want to replace the current one, which it shall do! This way, you can make sure that a perfect selection is always used for your adjustments.
Part One-And-A-Half – More Color! (2:30 min)
After creating the purple, I decided on adding a little more color to the sky. How about some more purple? So, I created a new layer by hitting CMD+Alt+Shift+N on the keyboard. Alternatively, you can also click on the new layer symbol just beneath the layer thumbnails on the lower right. Then I hit G (or Shift+G, depending on the tool you used previously) to get my Paint Bucket Tool. I selected a nice purple and filled the new layer with this color. This creates a layer with a solid color, which is not what we want. Therefore, I changed the Blending Mode of the layer to Hue, created a layer mask, and painted the effect through where I felt like it would look nice.
If you have not heard about layer masks and how to use them in Photoshop before, just read this to get started. I used the same techniques to add some more colors into the image, as easy as that. If you ever feel like changing a color after creating the layer containing it, just create a Hue/Saturation layer and clip it to the layer containing the color by hitting CMD+Alt+G. Then you can change the Hue and will just affect the layer with the solid color.
Part Two – Increase The Greens In The Grass (9:20 min)
To make the grass in the foreground look a little better, I created another Hue/Saturation layer. Then I selected the Green Channel – here is a cool tip: If you are not sure what colors you are affecting in an image, just drag the Hue and Saturation slider all the way to the right after selecting a certain color channel. Whatever looks like colors on drugs will represent the area affected by a color change. You can also adjust the range of colors selected by using the little slider at the bottom of the Hue/Saturation adjustment. So, after creating the adjustment layer and selecting green, I changed the Hue to a fresher looking green. Right after that, I used a Levels Adjustment Layer and dragged the slider for the midpoints towards the right a little bit. Using a layer mask, I made the effect visible in the grass, giving it a more contrasty look. Looking good!
Part Three – Sharpen The Grass (11:00 min)
To sharpen the grass in Photoshop, I first created a so-called Stamp Visible by hitting CMD+Alt+Shift+E on the keyboard. This copies everything that is currently visible onto a new layer. After changing its Blending Mode to Overlay, I went to Filter-Other-High Pass. There, I went with a very small radius (0.3 px), but you can experiment with this to your liking! Now, every time you duplicate that layer (CMD+J), the image will become a little sharper. After duplicating a couple of times, I selected all the High Pass layer, grouped them with CMD+G, created a layer mask, and made sure I have the effect visible in the grass only.
Part Four – Create A Dreamy Effect (13:35 min)
While the just created sharpness is nice, I also wanted to have a little bit of a dreamy effect in the grass. To get that, I created a Stamp Visible (CMD+Alt+Shift+E), changed it’s Blending Mode to Soft Light, went to Filter-Blur-Gaussian Blur, and blurred this new layer a little bit. The extent with which the effect is visible will depend greatly on your image, so don’t hesitate to experiment! Using a layer mask, I made sure the effect is only visible in the grass.
Part Five – Add Minor Movement To The Clouds (16:00 min)
As a last step, I sometimes like to create some movement in the clouds. To do this, I created a Stamp Visible (CMD+Alt+Shift+E) and went to Filter-Blur-Radial Blur. There, I selected Zoom as the method with an amount of 10 and hit Ok. Using a layer mask, I painted the effect ever so slightly into the sky.
All done, this was all there is on how to change color in Photoshop. Remember, shortcuts make your life easier and can speed up your processing a lot! Here is what I used in this image:
CMD+Alt+Shift+E to create a stamp visible
B for the brush
CMD+Alt+Shift+N to create a new empty layer
CMD+I to invert anything
CMD+J to duplicate a layer or a selection
Shift+G for the paint bucket tool
G for the gradient tool
CMD+Alt+G to create a clipping mask
If you like my images, make sure to check out my portfolio!
Don’t forget to get out there and take some pictures yourself! I hope you enjoy my Photoshop tutorials, especially this one on how to change color in Photoshop. I loved the image! See you next time.
PS: For many more great and amazing Photoshop tutorials on how to change color in Photoshop I recommend to have a look over at phlearn.com!


Nice start.. I think you can add some directions on your video. Such as shortcut key etc. It would be more user friendly.
Hello Kate, thanks for your comment! The Shortcuts I used in the video can be found just at the bottom of both the YT Video description or the blog post, if this is what you meant? Greetings!
Thanks for uploading video training manual. Your manual helped me to learn perfectly. Please post your next update. I hope it would be more advance.
Thanks Lisa! I keep it coming once a week here 😉 Glad to see you around!
Cool and dandy… Your tutorial posts are all time awesome.
Thanks for stopping by Nasrin!
Photoshop Tutorials are a lot better. It was good to use the shortcut key. Thank you
Thanks! Glad you stopped by 🙂
So much needed post.Thanks for sharing.This is really so helpful.
It’s not so easy to change color using adobe photoshop. But, It would be much better to change color using adobe lightroom. If you use Lightroom, you can save your time.
Thanks for your valuable sharing.
So amazing tutorial about how to use color in photoshop. Thanks for share this post.
Thank you so much for How to Change Color in Photoshop tips and trick share with me. I like this share.
Thank you for the tutorial post . I like the blog page design and your post .
Thank you Alosha!
Your techniques are pretty impressive. I love it so much
Memory Is Good For Future And Nice Photography
Wow, as a learner of photoshop this is a huge help. Thanks for sharing and keep posting.
Good tutorial for color changing on adobe Photoshop . I have read this article carefully and appreciated it guy . So much thanks for such well shared .