How to Use Photoshop to Edit Animals – Example: The Tigers of Ireland | Photoshop Tutorial
Welcome back! There are days, where flying away or making a huge trip is just not an option. In such instances, exploring local options is great – think about it, what is a place most cities have that you can go to? Yes, the zoo! One or twice a year I make my way to the zoo to have a relaxed day in the sun with some friends and some funny animals. Whether or not you like zoos, you gotta admit it is the perfect opportunity for any photographer to take the zoom lens and spend hours in front of a single protective glass to get that shot. Today, I got that shot from one of the tigers, who was overly active trying to get to his lady – who ignored him for the time I was there and just went to the other end of the area to get away from her boyfriend.
The image was nearly perfect, so this is a nice example of how to do basic image cleanup in Photoshop. Remember, if you like the video, make sure to subscribe for more weekly Photoshop and Photography action!
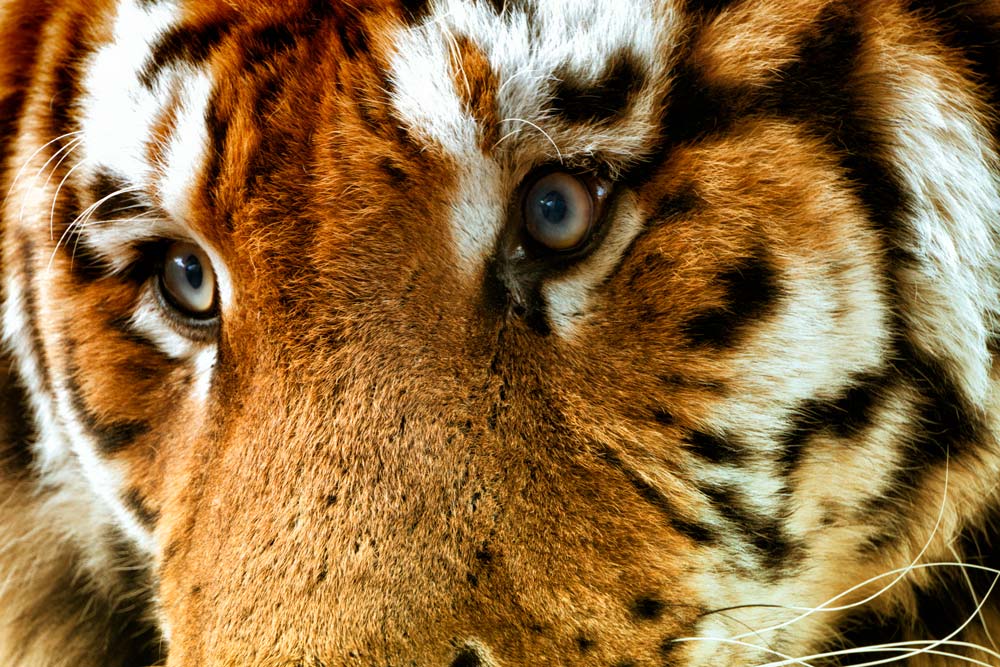
Here is the final image:
And here is the original:

Part One – Remove Stray Hairs in Photoshop (2:30 min)
While the fur of our little friend here is nearly perfect, there are some hairs that look out of place. There are many ways of removing such hairs in Photoshop – but in my case, I kept it simple. I started by creating a new layer (CMD/Ctrl + Alt +Shift +N on the keyboard) and selecting my spot healing brush tool (J). Once done, I zoomed in like no tomorrow, looked for the hairs I needed to remove, and just went over them with the tool. This was not even a challenge for the spot healing brush tool, so this part was super fast! Just make sure you have the ‘sample all layers’ option ticket at the top when selecting the tool.
Part Two – Adding Depth to the Eyes in Photoshop (4:10 min)
The original eyes were great of course, but I wanted to bring them out a little more. In the original, you can see that there are two dominant colors, red and blue – so a great base to increase those colors a little. For the protocol, when I started out using Photoshop, I did not learn all this stuff on my own, I watched tutorials online just like you do right now. I recommend the one from Phlearn here, Aaron Nace knows what he is doing and he is great as a teacher.
So, first I created a new layer again (CMD/Ctrl + Alt +Shift +N) and selected my brush (B). Then I held the Alt key and selected a color from the eye of the tiger. Using the color pallet on the right, I increased the brightness of this color on my brush and begun to draw random patterns with red in the lower part of the eyes. Once done, I did the same thing with the blue color which I placed a little more in the center of the eye. After changing both layers blend modes to Soft Light, I went ahead and gave both a blur of about 10px to make the colors blend a little more natural.
Now that the colors were in place, I then created two curve adjustment layers, one where I darkened things down, one where I brightened things up. After inverting the layer masks (CMD+I) and used a white brush to bring the effect out in certain parts of the eyes. The intensity is of course up tp you, but I think it is a great step when how to use Photoshop to edit animals.
Part Three – Creating an Overlay in Photoshop (12:00 min)
The last part of this relatively simple processing was to create an overlay, that would make the top left of the image relatively red and the lower right of the image a little more orange. You could do these things yourself, but this would be time-consuming and is not really needed, especially if there is a fast free version. For this, I used the Google Nik collection which you can get for free here. Once you have it, make sure that all your information are on a separate layer by hitting CMD/Ctrl + Alt +Shift +E. With this layer selected, go to Filter-Nik Collection-Color Effex Pro-Bi Color Filter. There you can play around a little, but you will quickly see what you have to do, hehe.
And this was it! Of course, you can add more things such as sharpening or noise removal if you want to, but I did not mention them as I mention those things relatively often. Up to you what you do when learning how to use Photoshop to edit animals!
Remember, shortcuts make your life easier and can speed up your processing a lot! Here is what I used in this image and most of my Photoshop tutorials:
B for the brush
X to change between background and foreground colors
CMD+I to invert anything
CMD+J to duplicate a layer or a selection
CMD+Alt+Shift+N to get a new layer
CMD+Alt+Shift+E to get a stamp visible
CMD+F to run the last filter again
On a Windows PC, just replace the CMD with Ctrl.
If you like my images, make sure to check out my portfolio!
Don’t forget to get out there and take some pictures yourself – time for some photography in Ireland? Have you been to the to the Dublin Zoo yourself? Show me your images!! I hope you enjoy my Photoshop tutorials and this image in particular and I see you next time. Enjoy learning how to use Photoshop to edit animals.